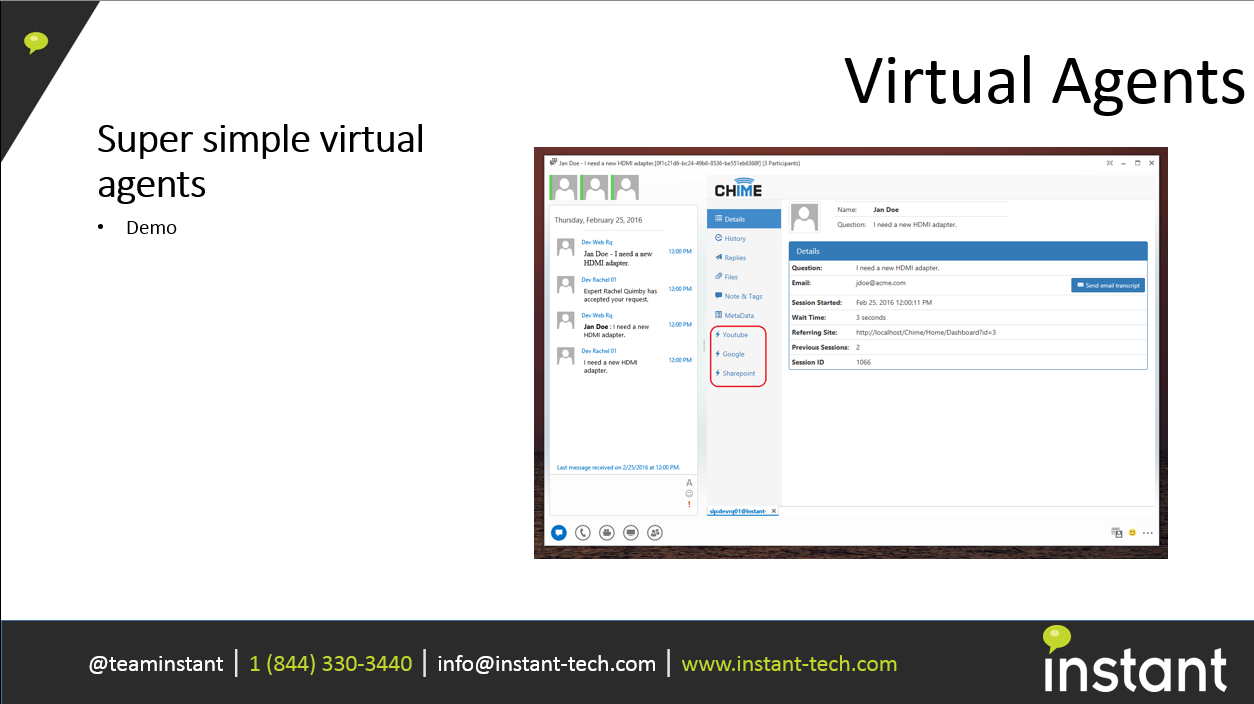
Virtual Agents
Get to know the awesome power of Chime's virtual agents.
Have a question about virtual agents? Ask one of our developers at InstantDev@instant-tech.com.
Have a question about virtual agents? Ask one of our developers at InstantDev@instant-tech.com.
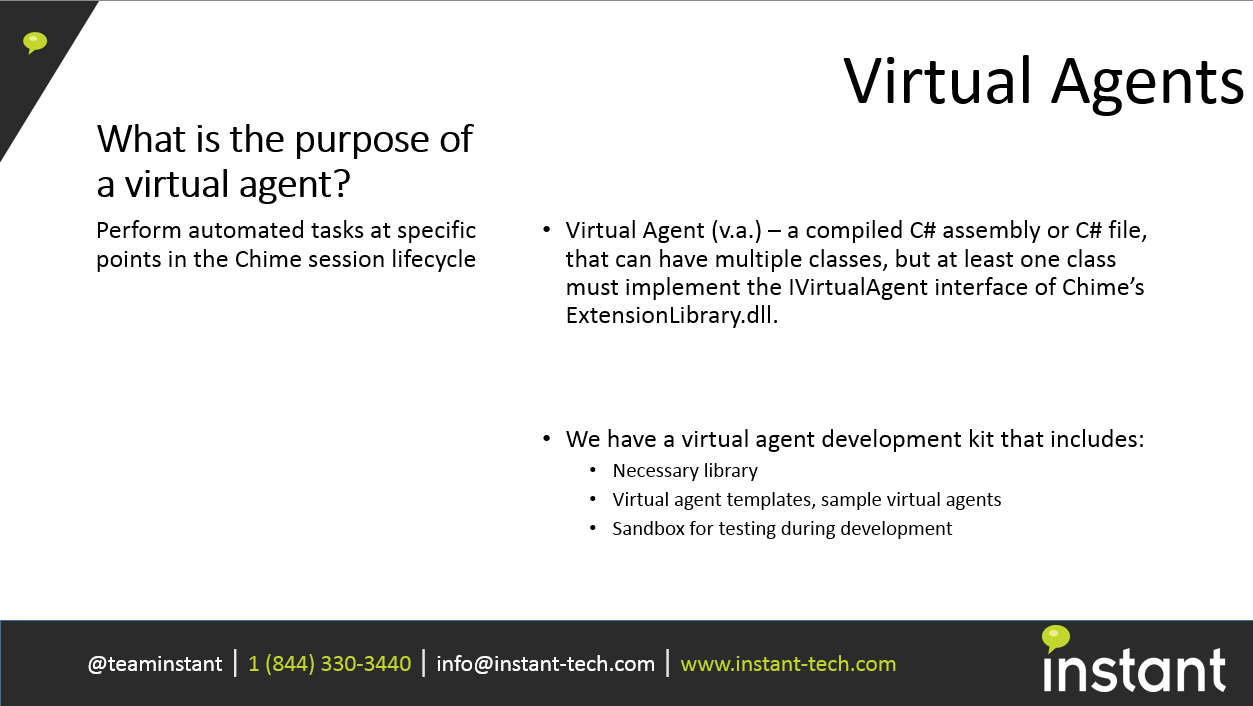
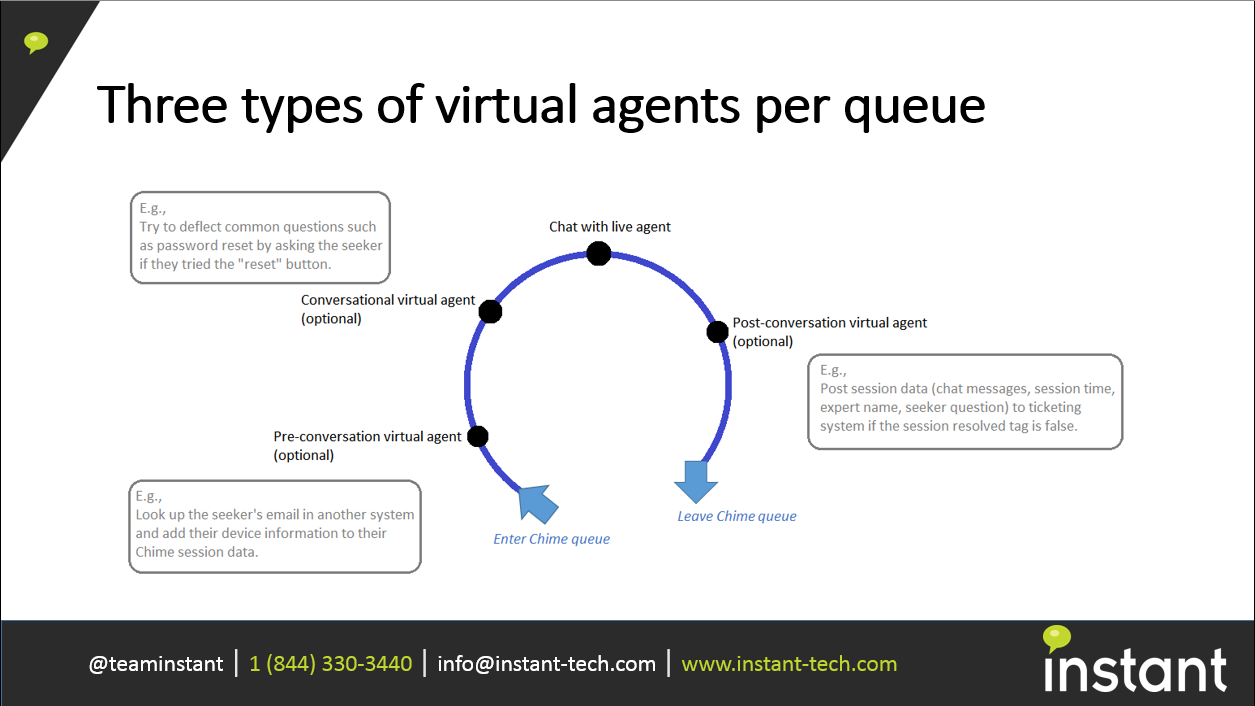
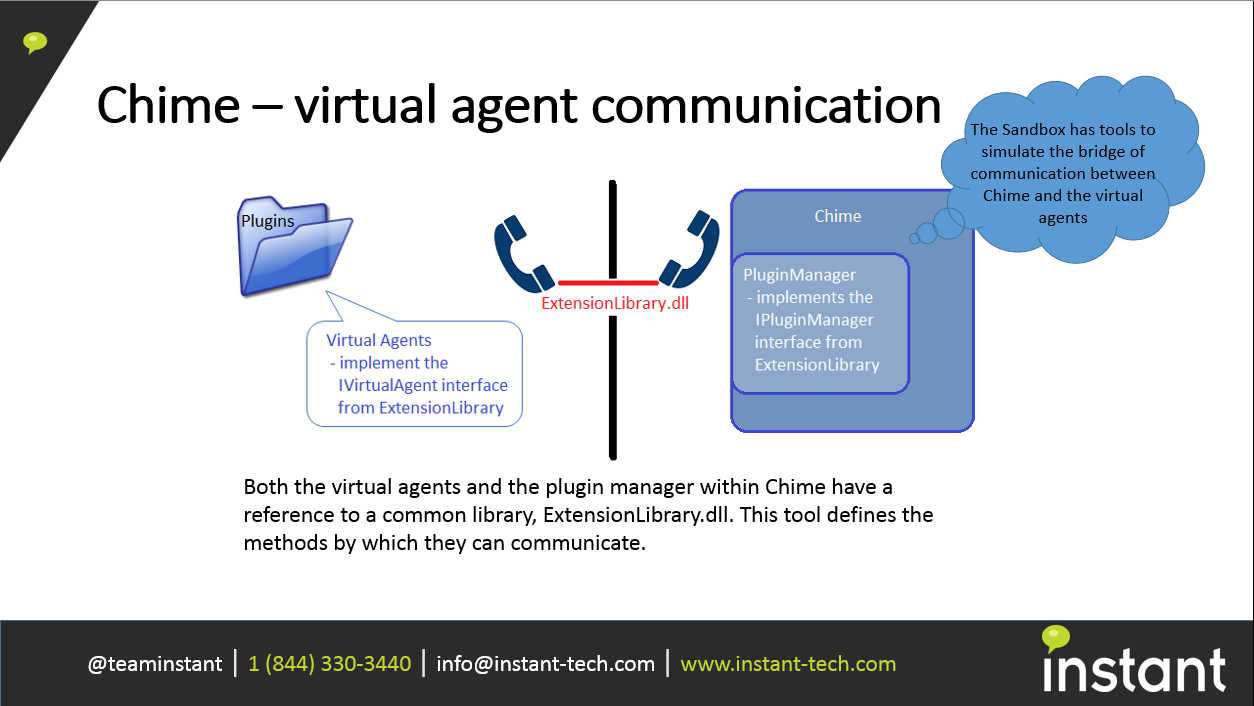
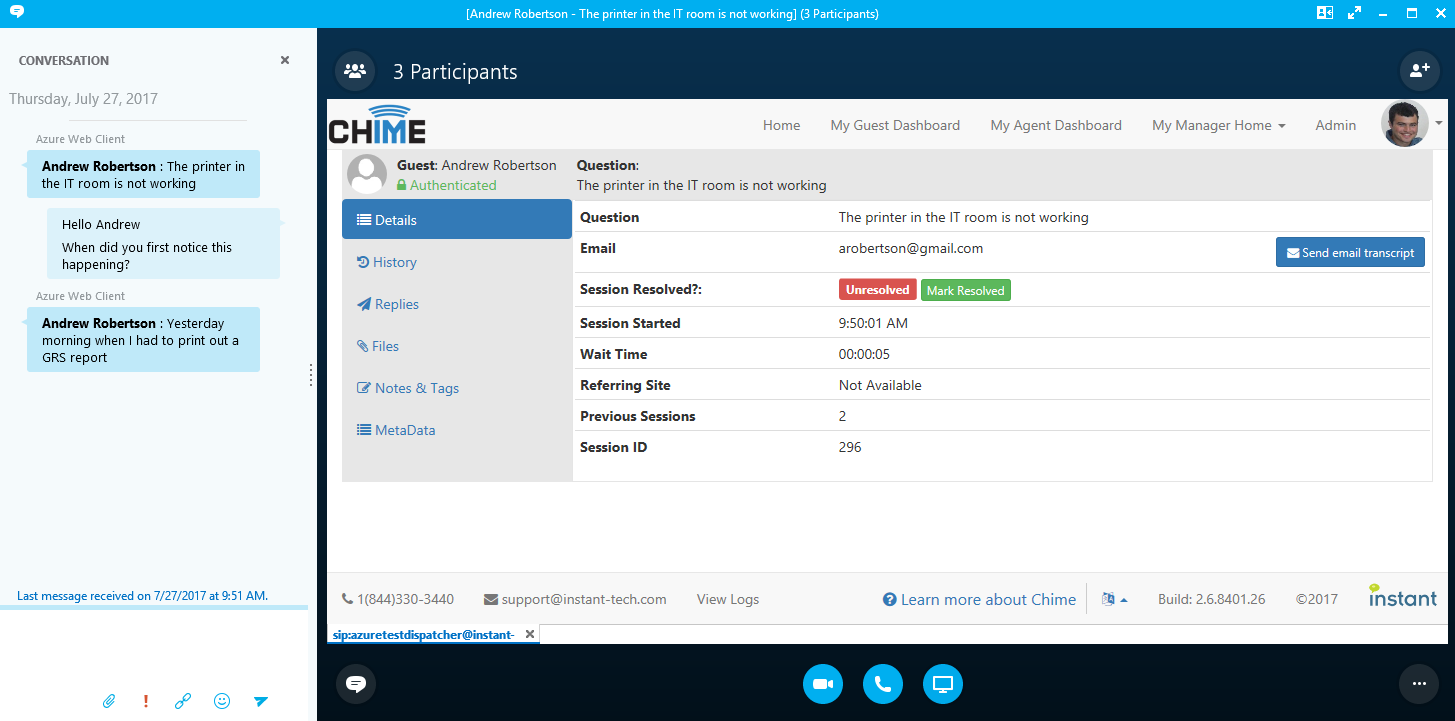
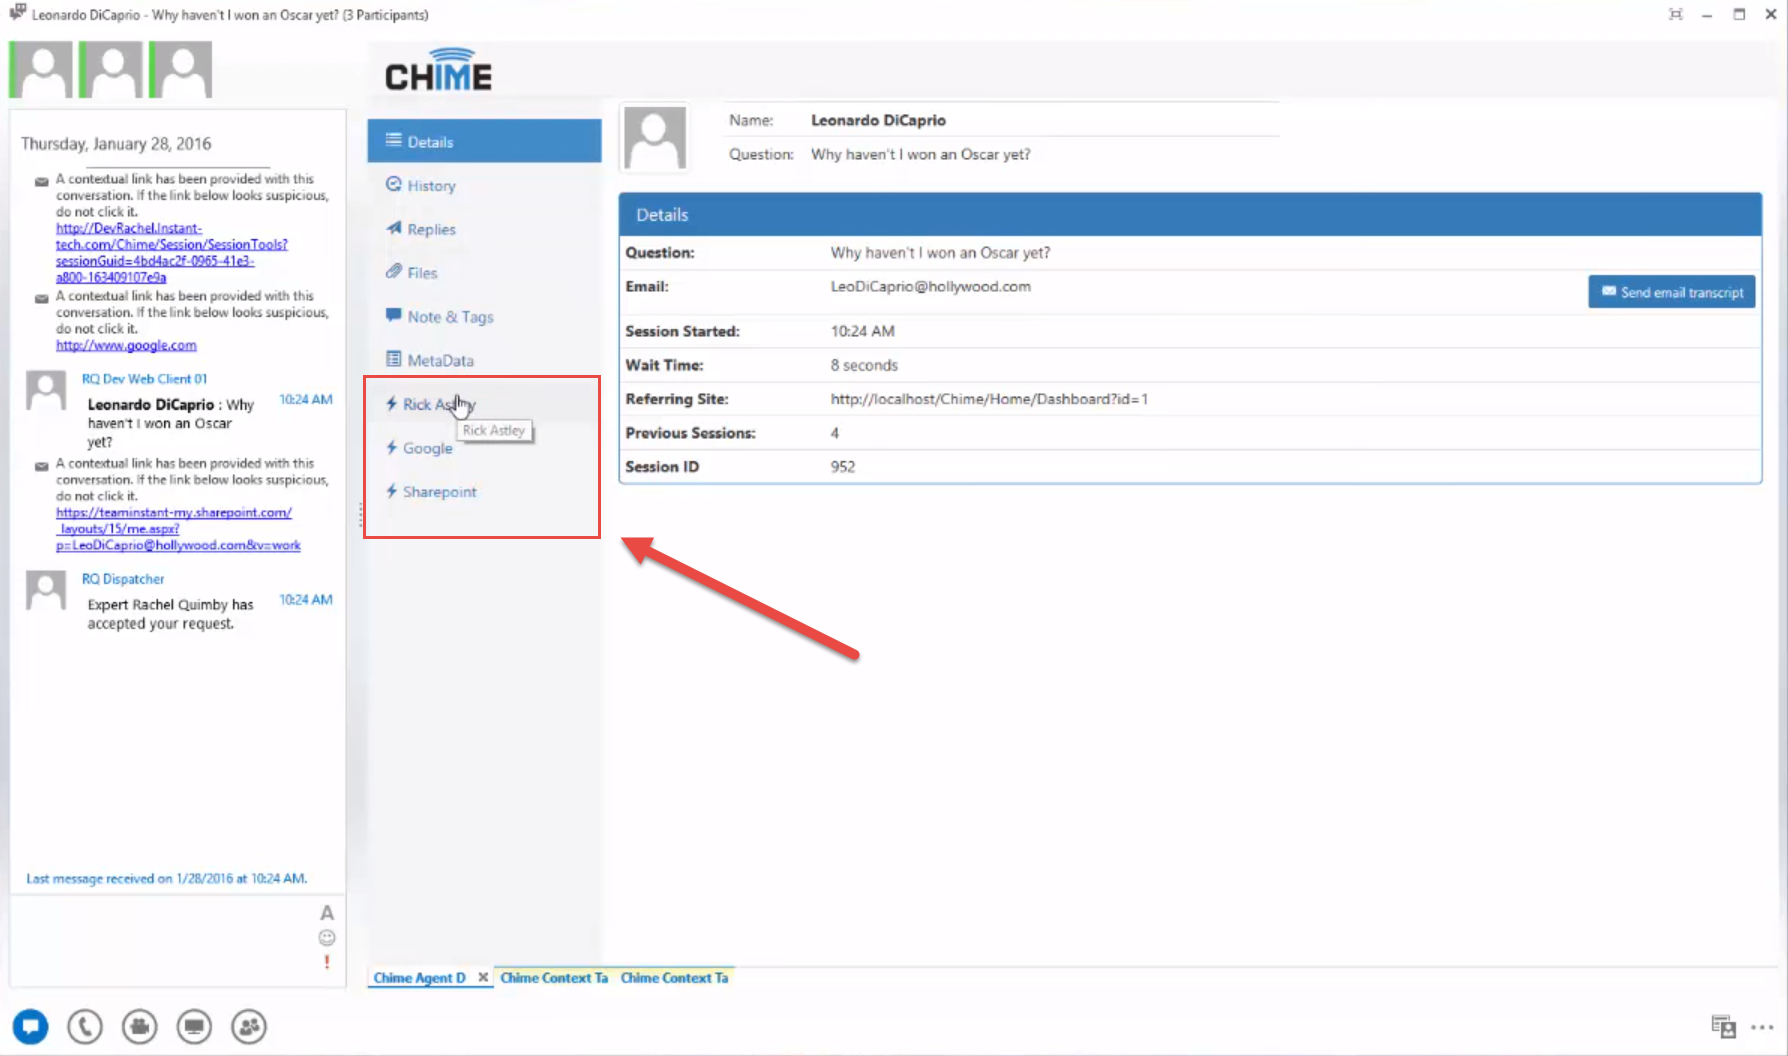
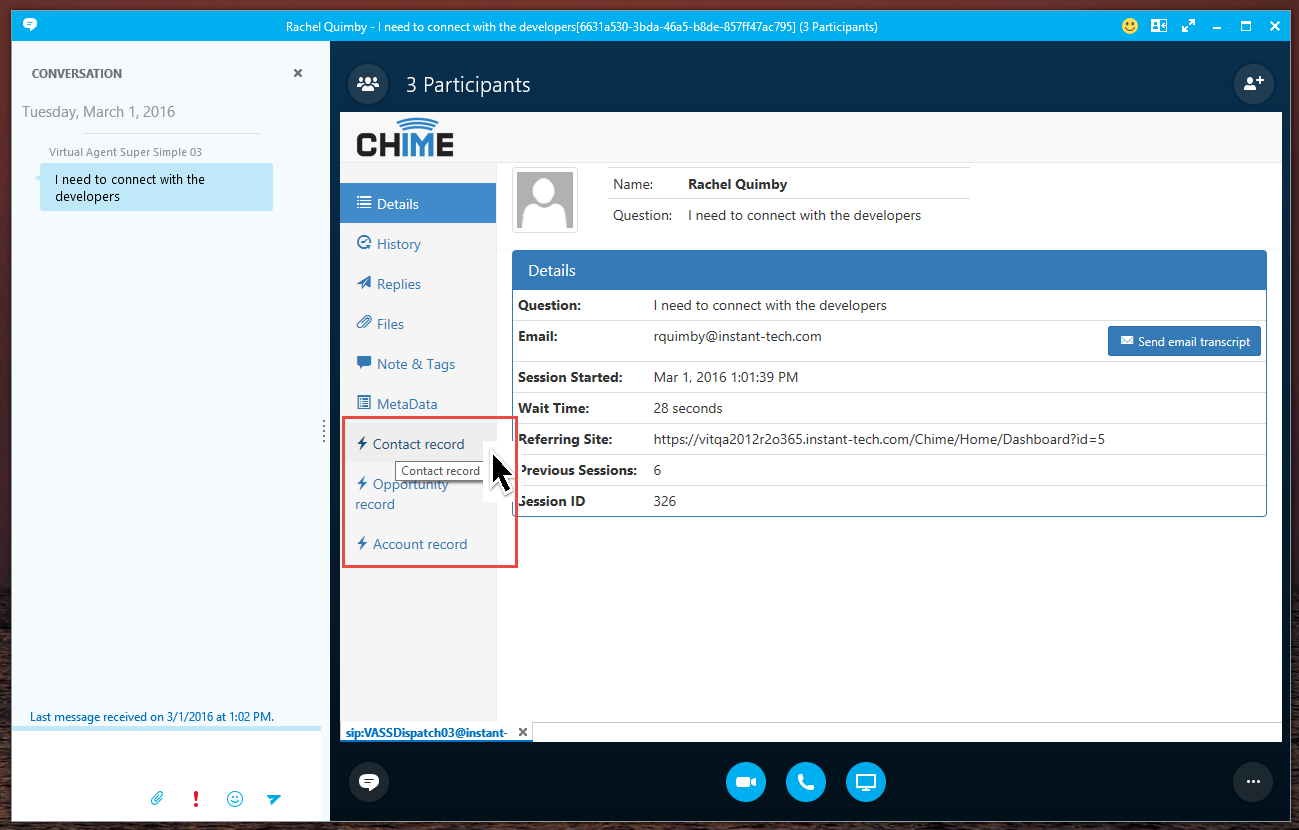
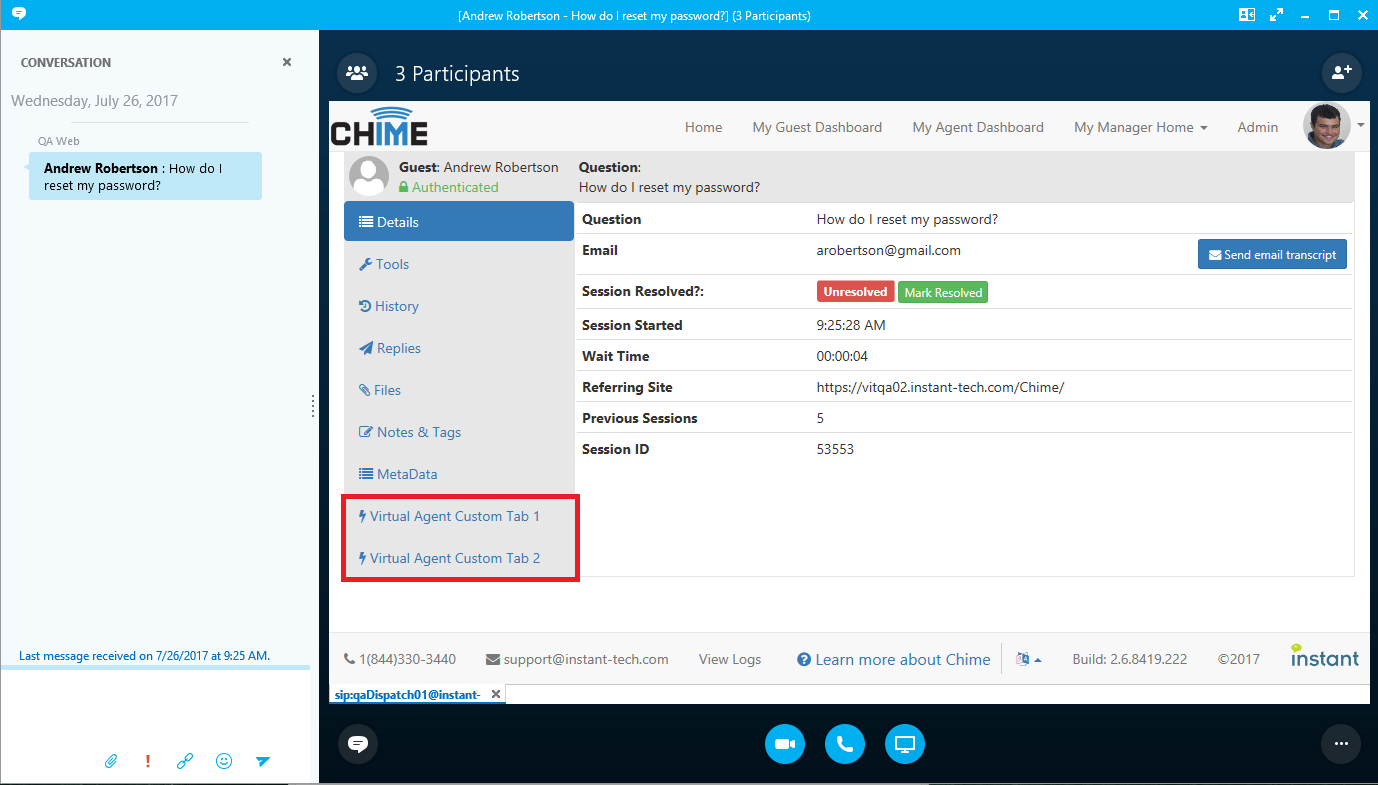
A Chime virtual agent is a compiled C# assembly or C# file that's read like a scripting file and implements a specific interface from Chime's ExtensionLibrary.dll. The purpose of a virtual agent is to perform automated tasks at specific points in the Chime session life cycle. There are three types of virtual agents per queue, all of which are optional.
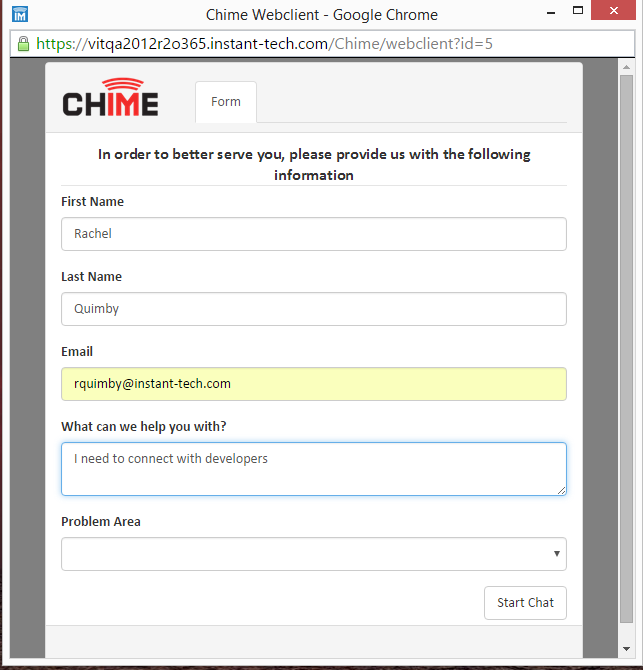
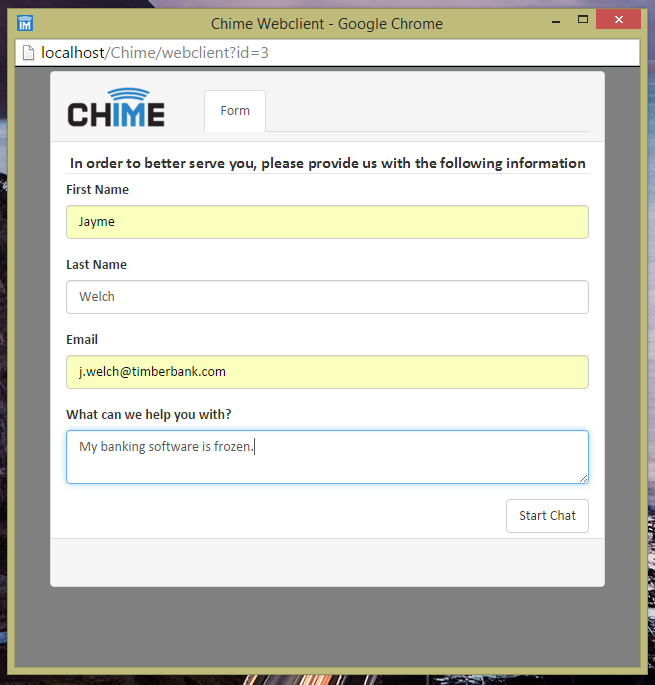
We have a virtual agent SDK that includes necessary libraries, virtual agent templates, sample virtual agents, and a sandbox for testing during development. Currently we have examples of virtual agent integration with Salesforce®, Microsoft Dynamics®, ServiceNow®, and Alchemy®. You can find integration examples using their API's below.
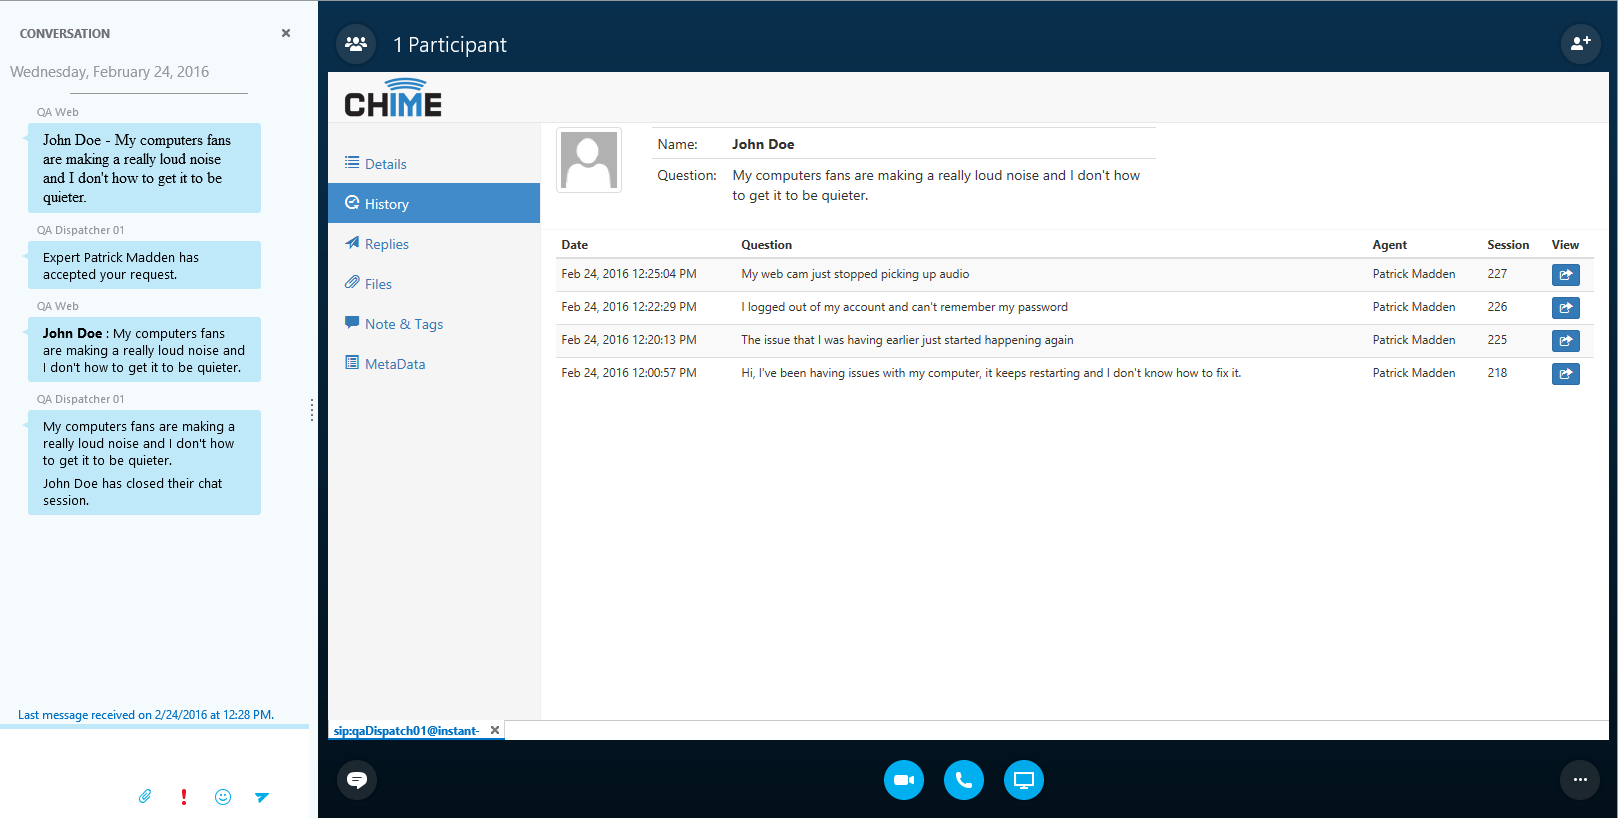
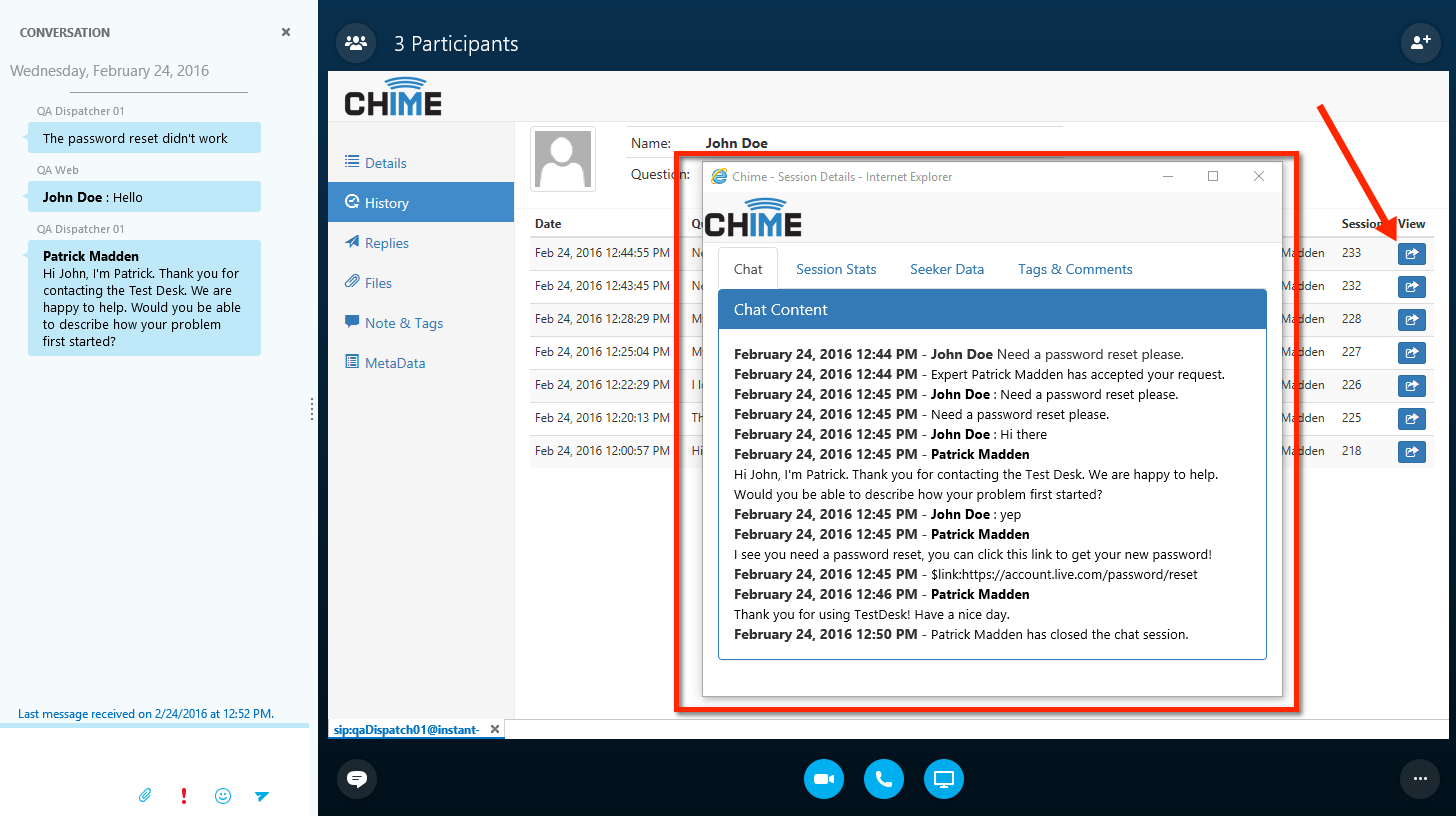
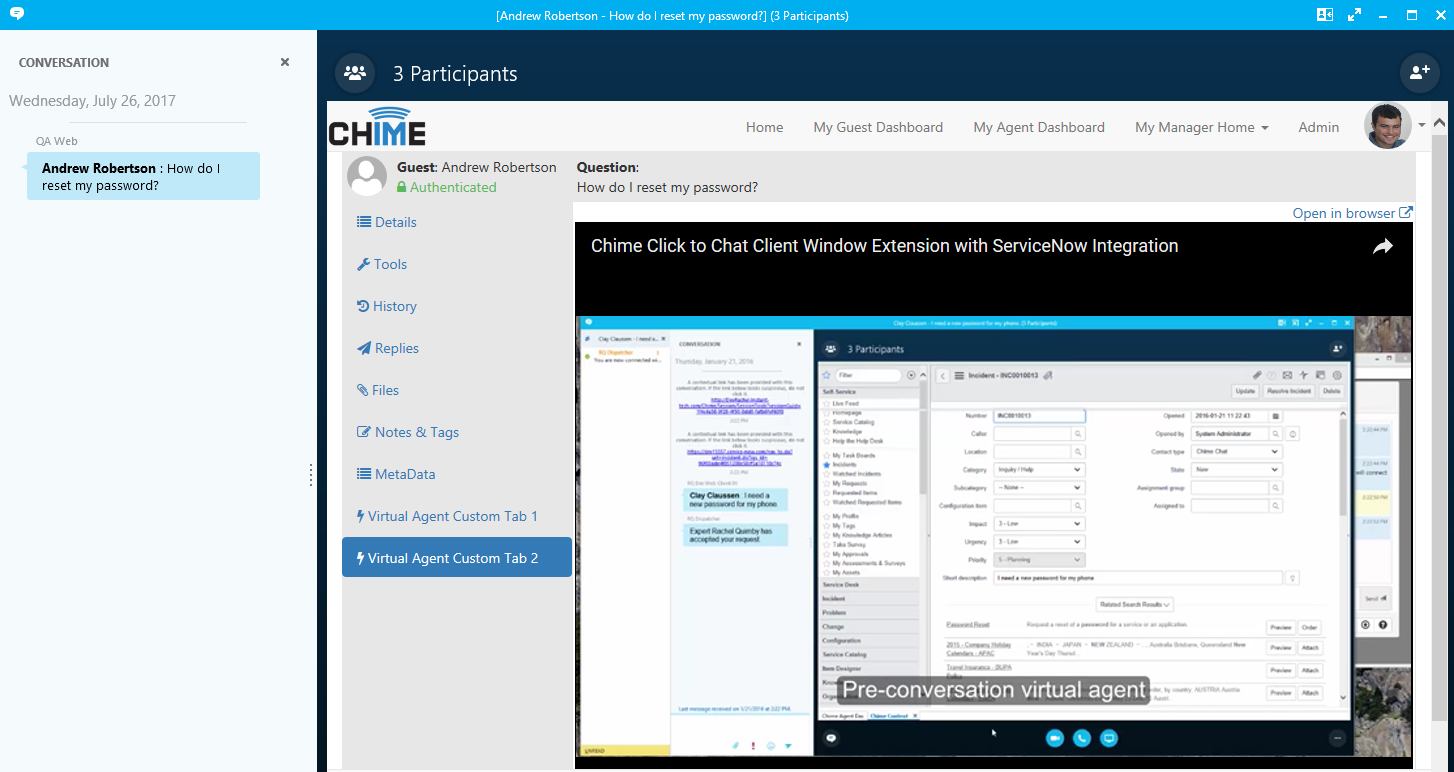
To deploy a virtual agent from the collection of samples from the Virtual Agent SDK, first understand what the sample does by click on any of the Individual Pages on the left-hand side. Watch the Integration video, or click-through the slide show of screen shots to understand what the "out of the box" sample is programmed to do. Next open the sample (Virtual Agent SDK\Samples) in Visual Studio and (if applicable) change the credentials XML file to have your organizations credentials. Once the credentials are saved, build the project and the resulting DLL file (along with credentials file and any dependent references) can be dragged to the Plugins folder ("C:\ Program Files\Instant Technologies\Chime For Lync\Plugins") to be loaded into Chime. When the virtual agent file and any dependent files are in the Plugins folder, go to the Chime Admin section, sub-section Virtual Agents, to turn on the Extension Manager or reload the Virtual Agents to load them into Chime. Next enable a virtual agent to make it available to assign to a queue in Queue Settings sub-section People. Read the Virtual Agent SDK document HowToIntegrateWithChime for more information about any of these steps.
Some of the sample virtual agents depend on minor changes to the target integration service.
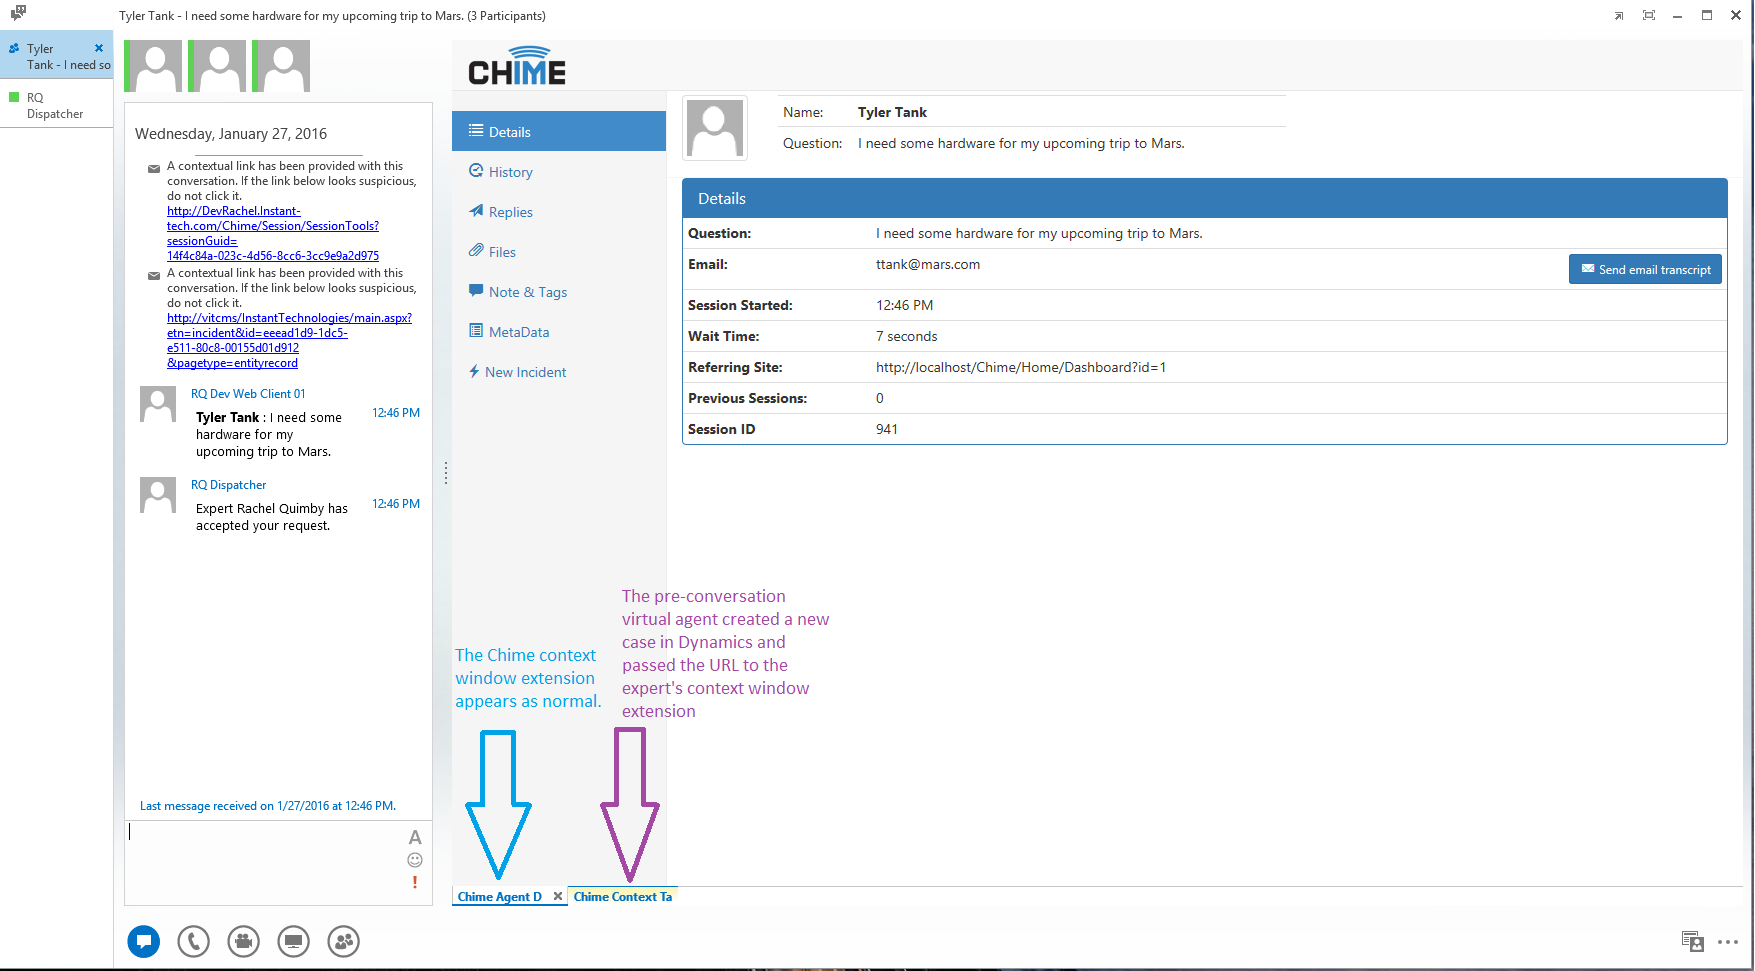
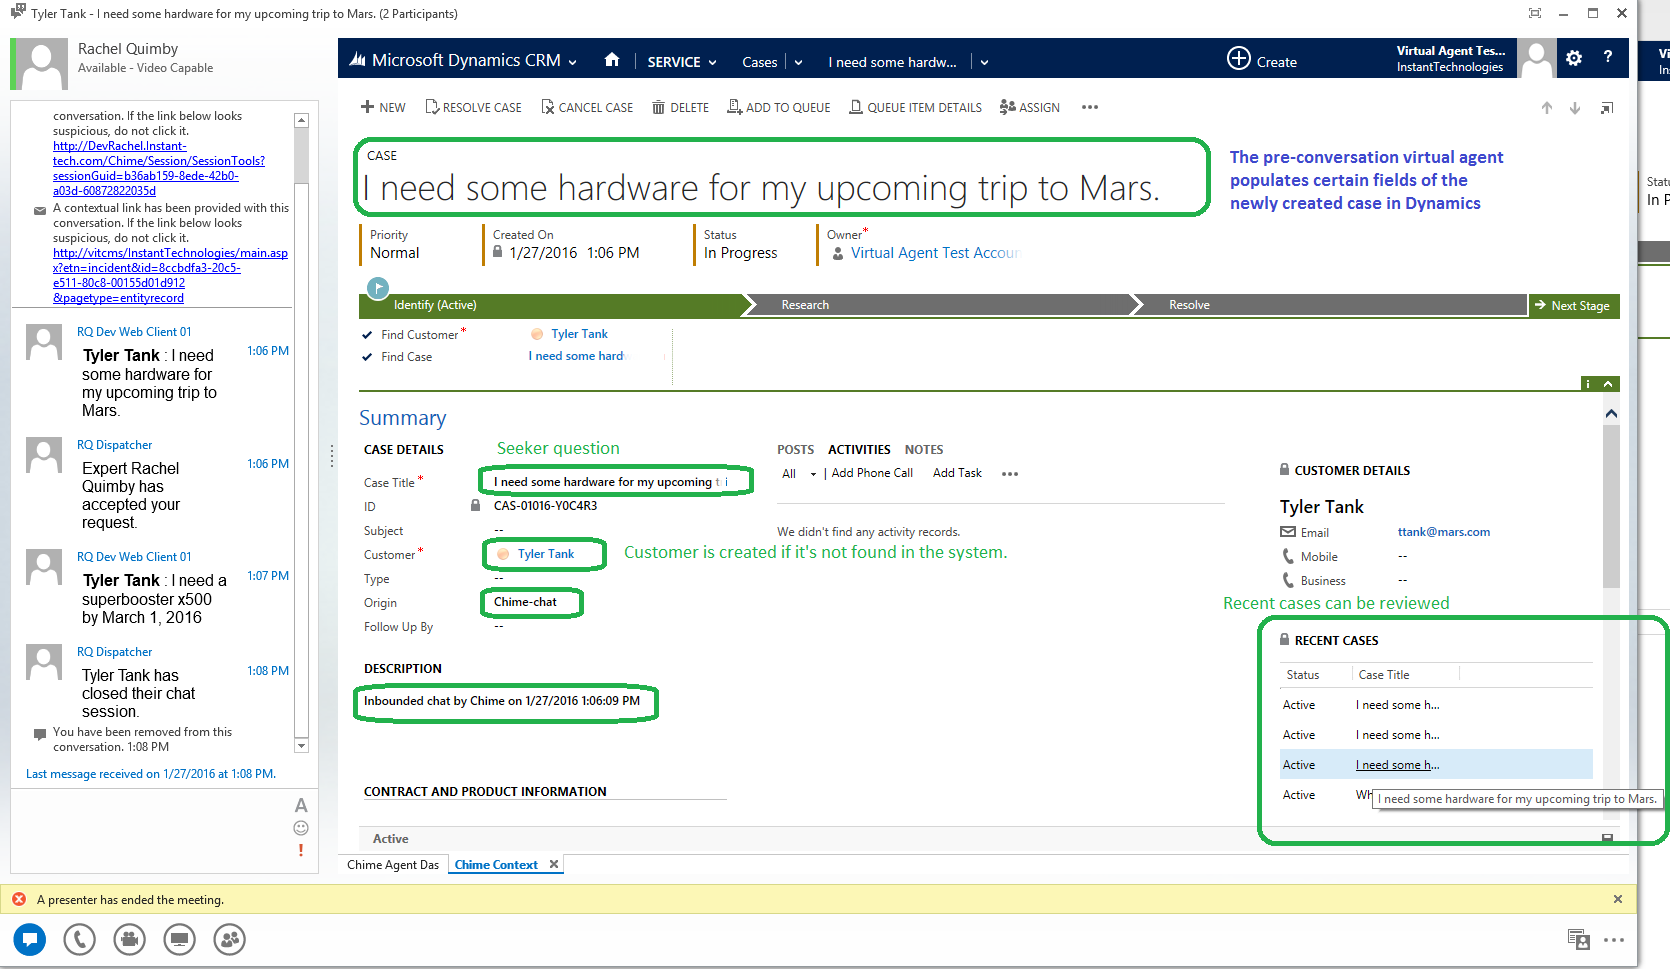
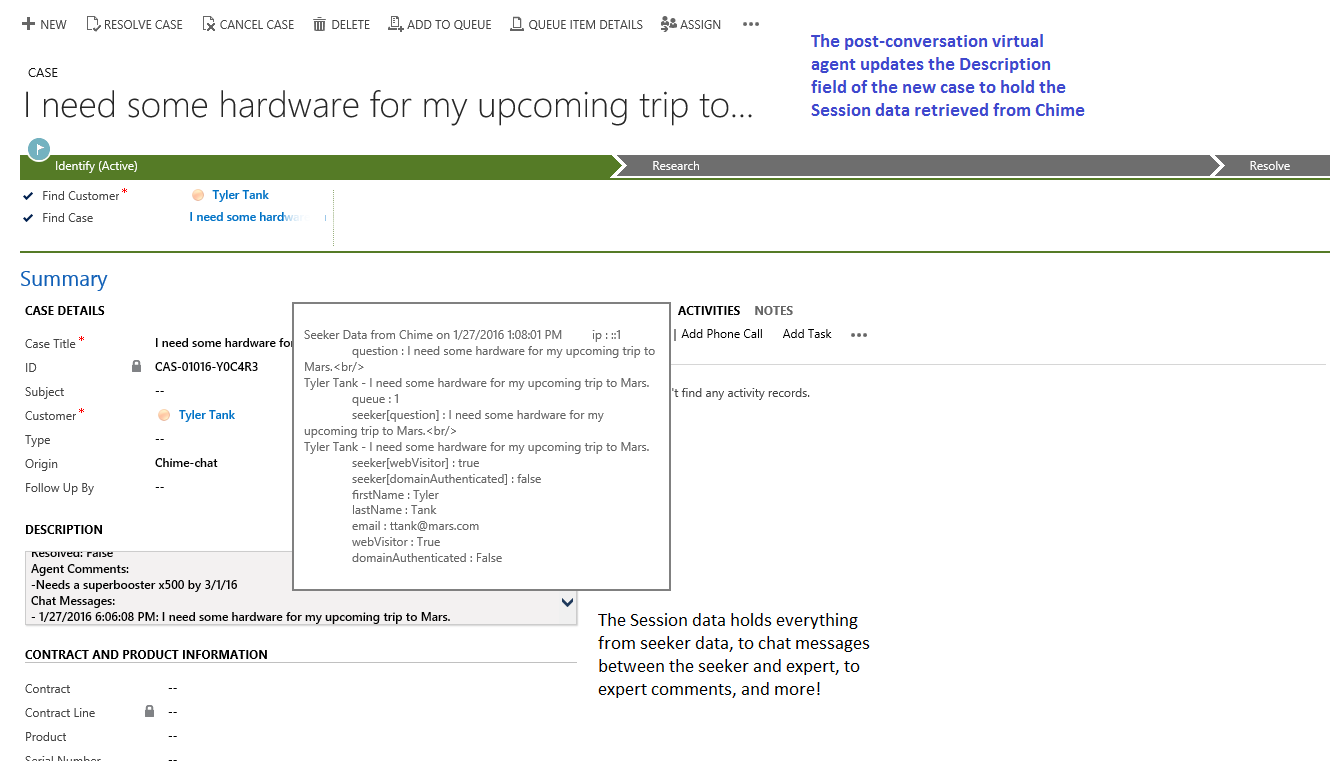
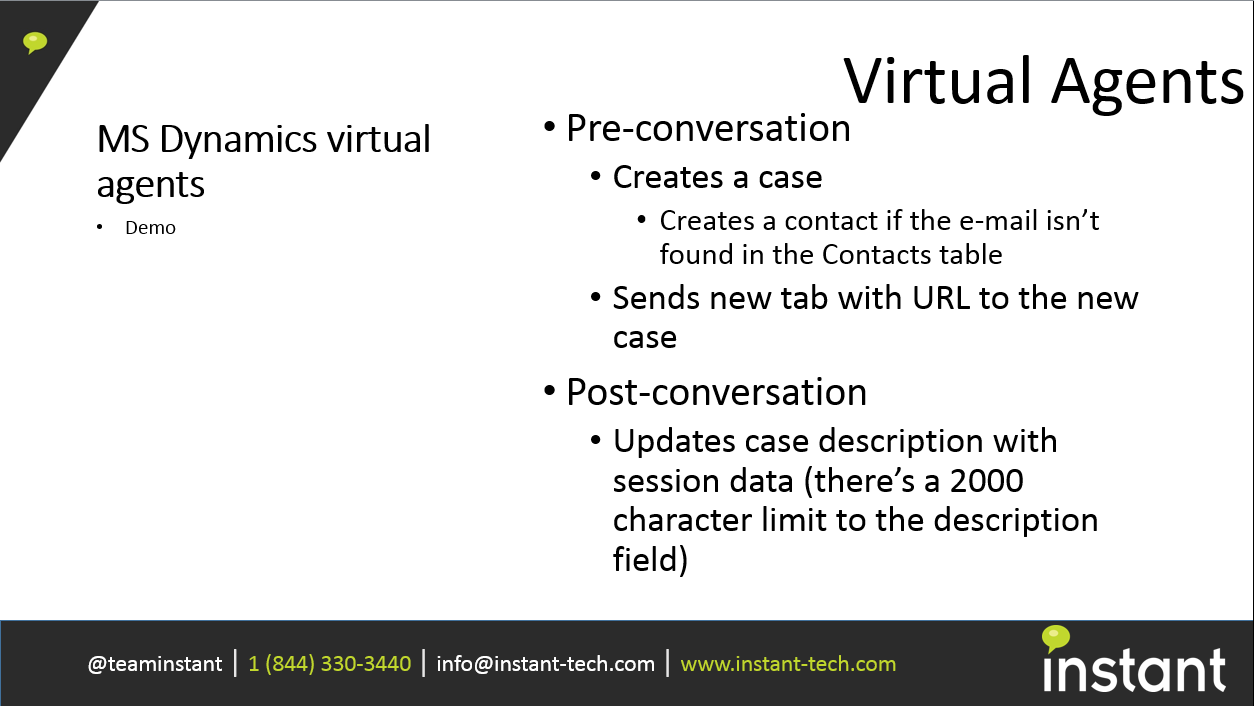
This sample creates a new Case in Dynamics and fills out some fields from information within Chime. One of the things it does is set the Case Origin field to "Chime-chat", which is a customization of the Dynamics CRM application. The pre-conversation virtual agent tries to set the "caseorigincode" field of the Case entity to "100,000,004". This may fail if there is no option for that field with a value of "100,000,004". To make this customization in Dynamics go to Settings, Customize the System, then choose Entities from the left-side navigation bar. Double-click the Case entity to open and edit, then choose Fields from the left-side navigation bar under Case. Double-click "caseorigincode" to edit this field, then choose Edit next to Option Set. Add a new option with name "Chime-chat" and value "100,000,004" and finally save the changes.
The ServiceNow sample depends on a similar kind of customization as the Dynamics sample. In this sample the pre-conversation virtual agent assumes there is an option of "chime-chat" for the contact type field of the Incident entity. The sample might not behave as expected if this field option doesn't exist. To make this customization within ServiceNow, from the Admin home page, go to Data Management, Personalize Form, then Choose Incident [incident] as the table and select Next, then in the upper navigation bar choose to go back to Configuring Incident Form. Click the cog settings button in the upper-right hand corner, then right-click the Contact type field and select "Configure Dictionary". Here you can add a new choice. Insert a new row under Choices, with label "Chime Chat", value "chime-chat", language "en", and inactive set to false. Choose Update to save these changes.
Note: The following steps can be downloaded here » SMTP_Integration.docx
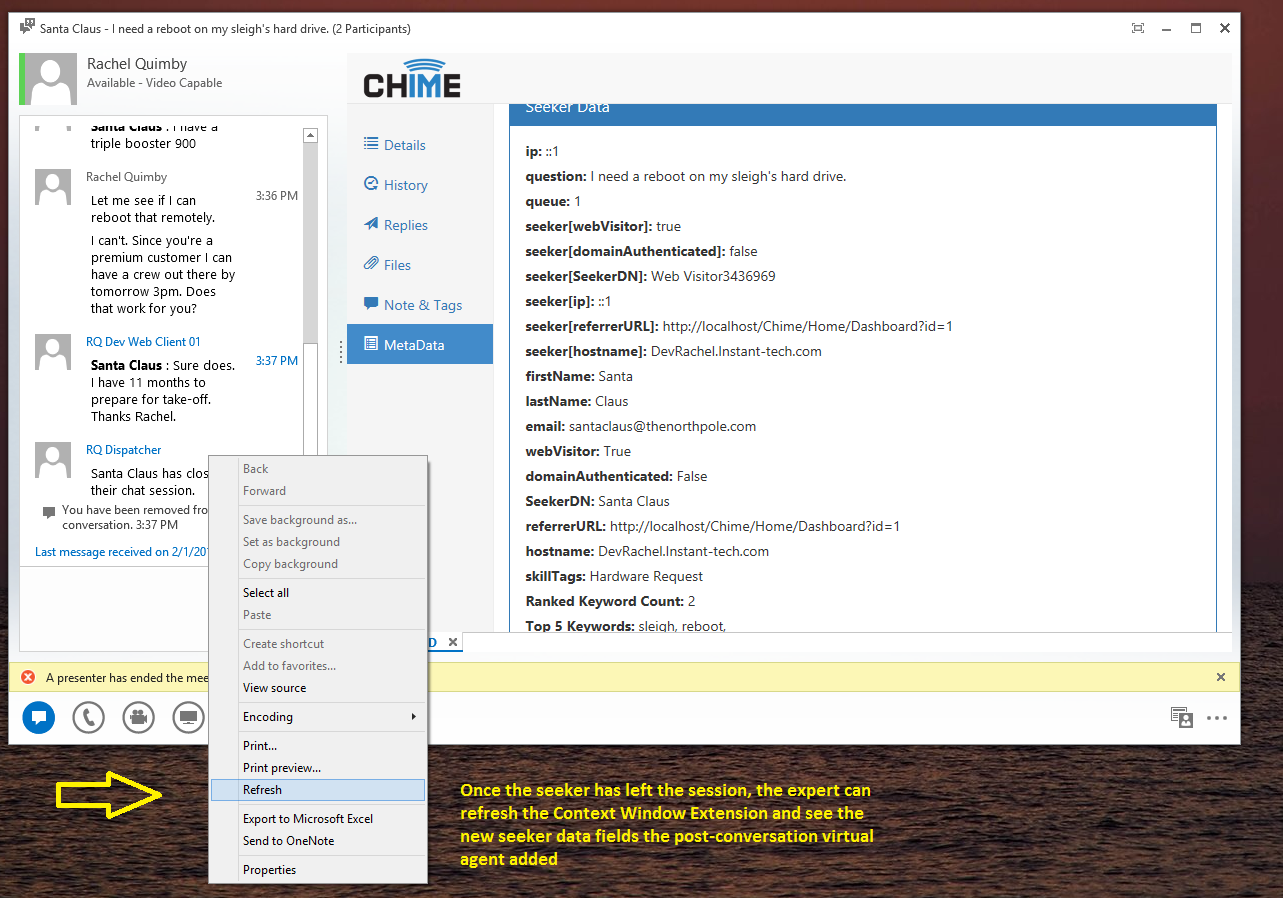
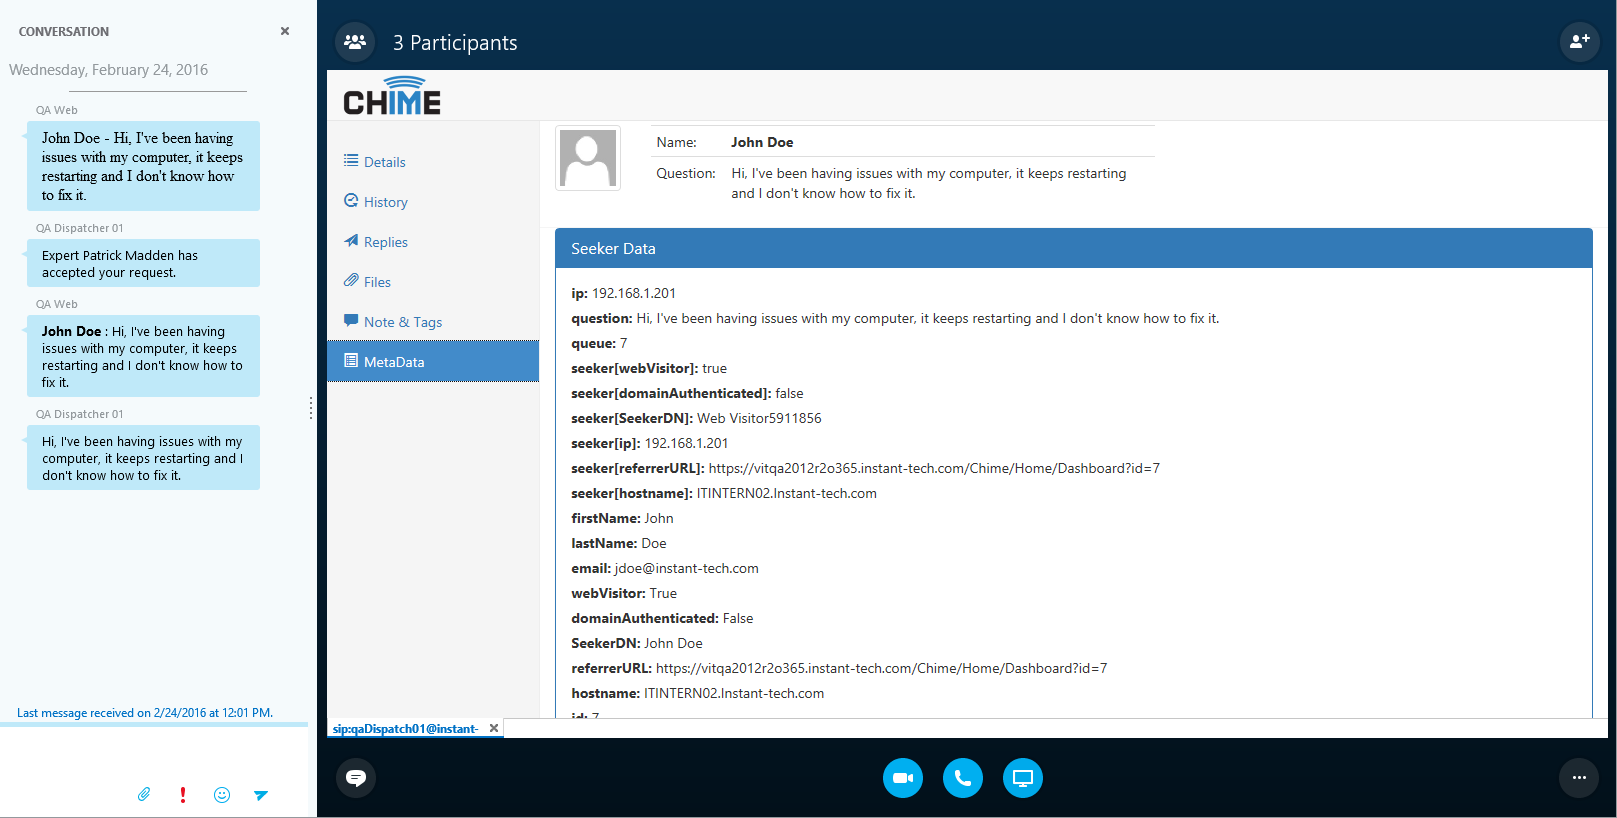
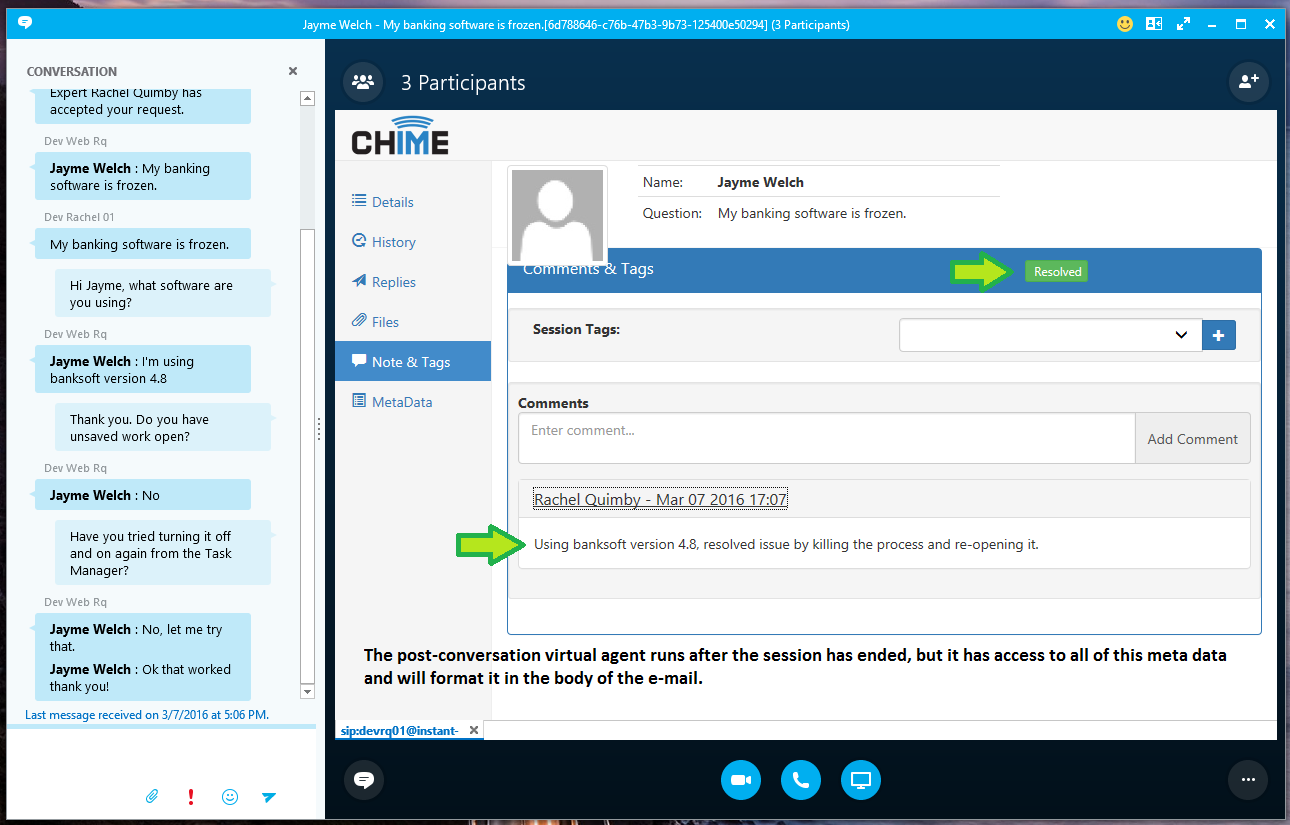
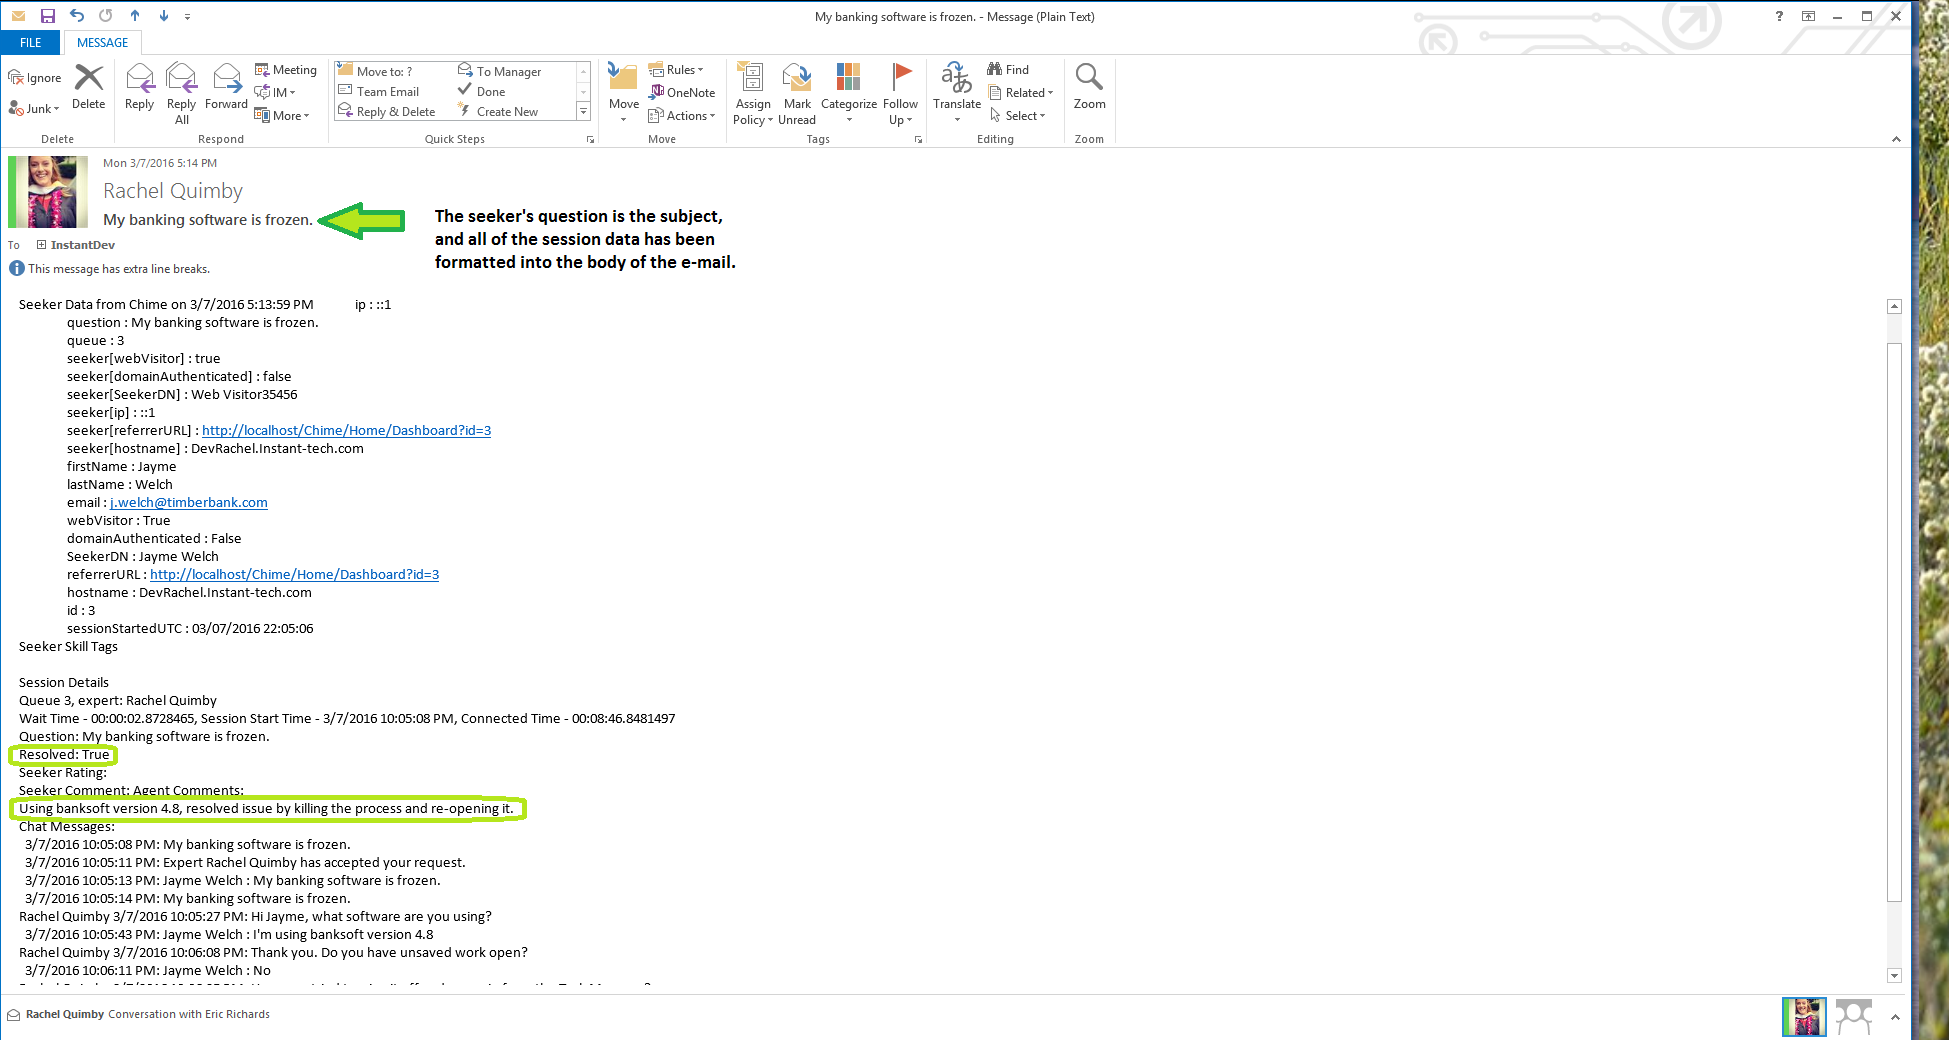
We’ve heard several requests to have an e-mail transcript sent to other mailboxes after the Chime session has ended. This sample shows how a post-conversation virtual agent (download or click-through the Virtual Agent Presentation slide show if you don’t know what this is) can accomplish this by wrapping up all of the session data into a body of text and sending it off as an e-mail. Below is some explanation for how to do this in C# and above you can see a few screenshots (under SMTP Integration) showing the flow of integration and how the dispatched e-mail transcript will look.
The project this post-conversation virtual agent sample resides in has a reference to ExtensionLibrary.dll (this can be downloaded in the Virtual Agent SDK), this has the necessary interface definitions to integrate with Chime. Also, this class uses the following .NET references:
using System;
using System.Collections.Generic;
using System.Net;
using System.Net.Mail;
using System.Text;
Assuming you can do this, and you have returned a post-conversation virtual agent type on the Load method, there’s not much more to do.
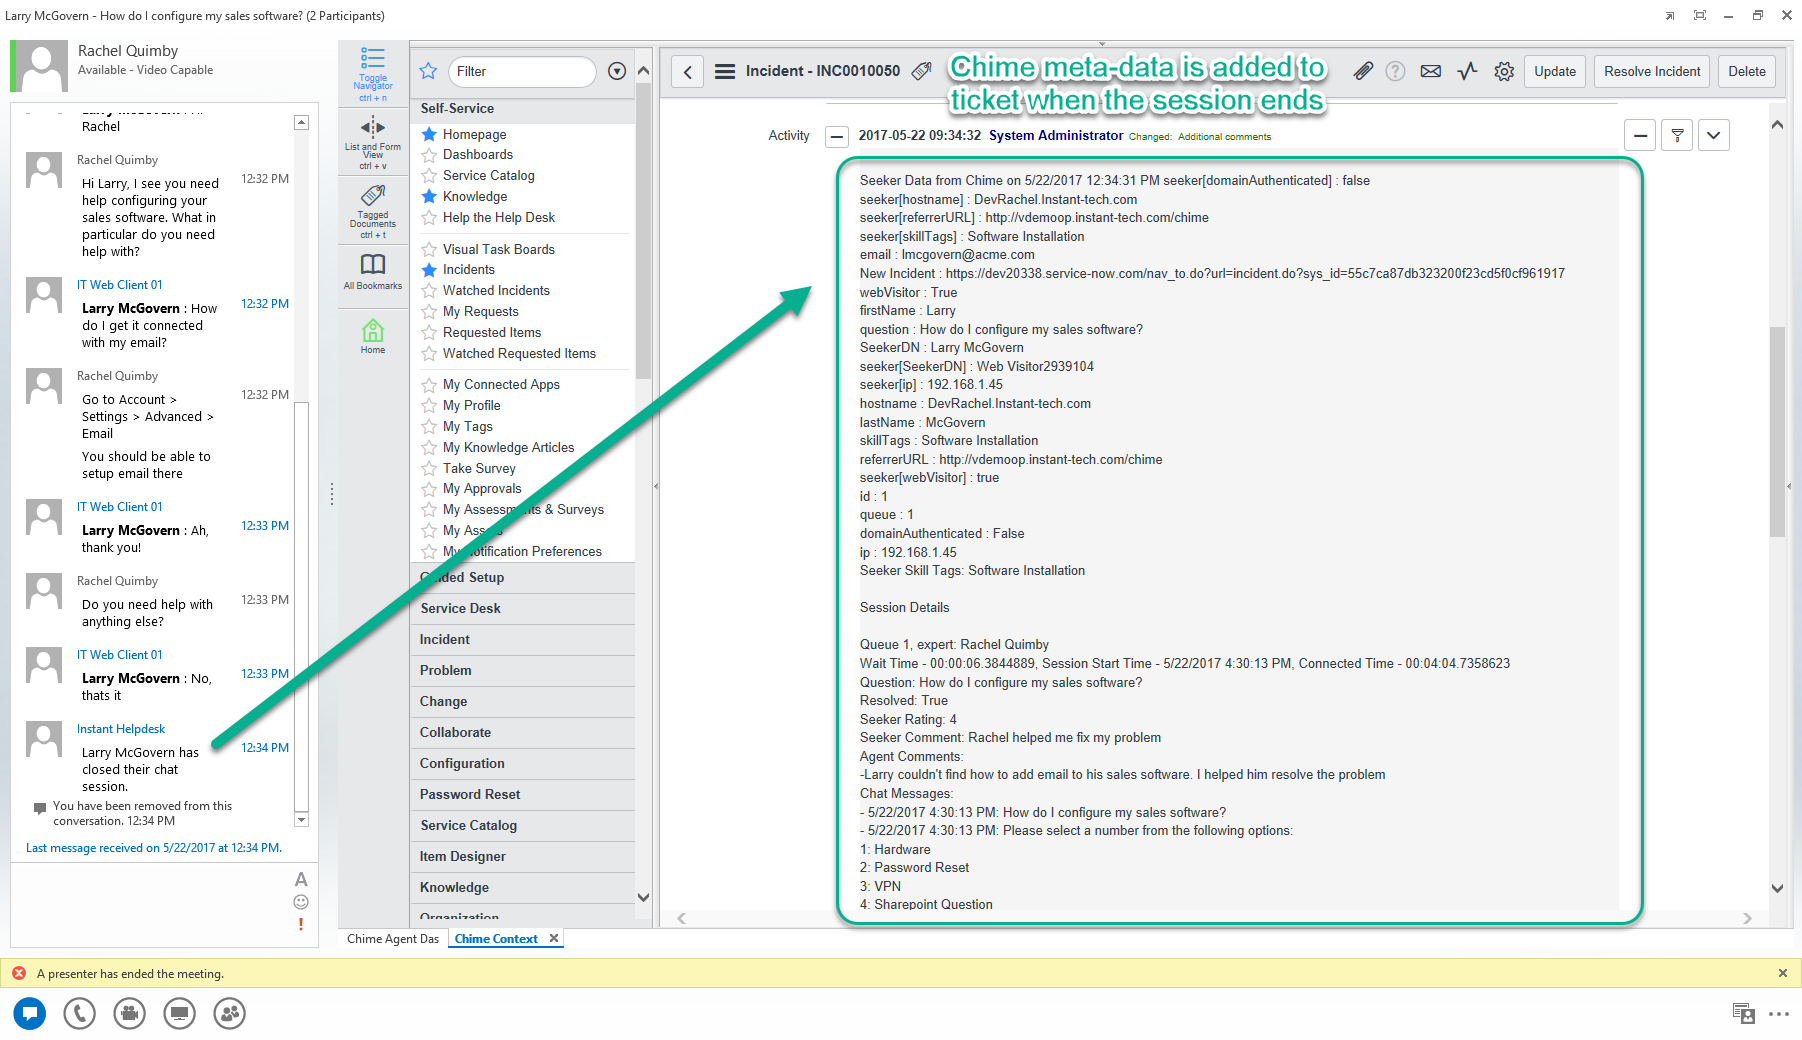
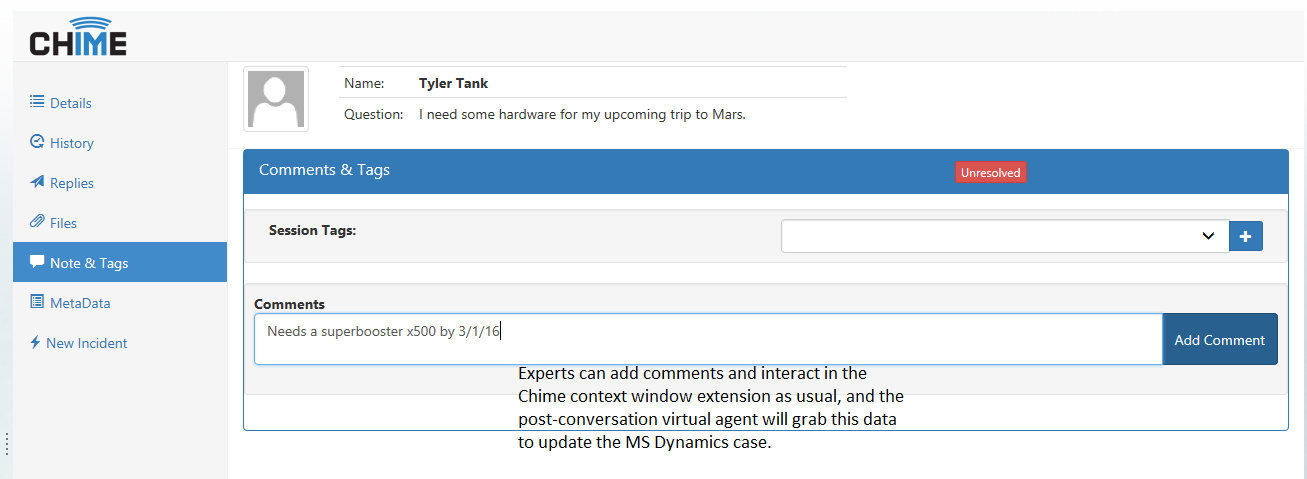
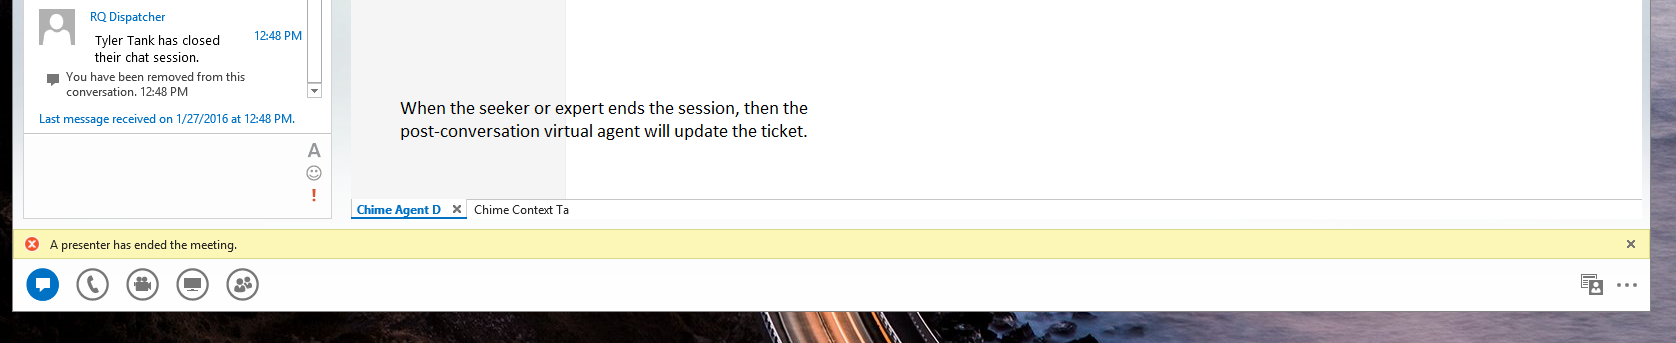
In the SeekerConnected method, the virtual agent should ask the PluginManager for the session’s PostChatData, that is all the data that was known when the seeker entered the queue, and the other data the was added over the course of being connected with a live agent, such as chat messages, skill tags, etc. In this example, we ask for the “clean” PostChatData which is stripped of HTML markup and doesn't contain empty seeker data values. Then we send that data to be dispatched in an e-mail, and finally we tell the PluginManager to disconnect us. For post-conversation virtual agents, the keepAlive value is ignored by the PluginManager because the session is already completed. i.e., “dead”.
public bool SeekerConnected(int sessionId)
{
    va_state = VirtualAgentState.Busy;
    PostChatData chatData = _pluginManager.PostChatEventClean(sessionId);
    DispatchEmail(chatData);
    bool keepAlive = true;
    _pluginManager.DisconnectVirtualAgent(sessionId, keepAlive);
    va_state = VirtualAgentState.Online;
    return true;
}
Now that we have the session data, we can format it into an e-mail message and send it to a mailbox, using credentials that are authenticated into the network. (Note, the WriteToString method just builds a string out of the different object fields of PostChatData).
private void DispatchEmail(PostChatData chatData)
{
    var data = Convert.FromBase64String(_password);
    var pw = Encoding.UTF8.GetString(data);
    var Credential = new NetworkCredential(_userName, pw);
    var _client = new SmtpClient(_host, _port)
    {
        EnableSsl = _useSsl,
        Credentials = Credential
    };
    var msg = new MailMessage(_userName, _targetEmailAddress, chatData.question, WriteToString(chatData));
    _client.Send(msg);
}
Have a question about Chime integration with SMTP? Ask one of our developers at InstantDev@instant-tech.com.
Note: The following steps can be downloaded here » SalesforceIntegrationDoc.docx
The following examples use these references. These examples use Newtonsoft Json library to deserialize the responses from Salesforce, and Microsoft Visual Studio Web API library to make a Patch HTTP request.
using Microsoft.VisualStudio.Services.WebApi;
using Newtonsoft.Json;
using System;
using System.Collections.Generic;
using System.IO;
using System.Linq;
using System.Net.Http;
using System.Net.Http.Headers;
using System.Text;
using System.Xml.Linq;
This code snippet shows you how to use your salesforce credentials to retrieve an access token and construct an authentication header for making subsequent HTTP requests to the Salesforce REST API.
public class SFResponse
{
    public string access_token = "";
    public string instance_url = "";
    public string token_type = "";
}
public static async void ConnectToSalesForce()
    {
        StringBuilder body = new StringBuilder();
        body.Append("?grant_type=password&");
        body.Append("client_id=" + client_id + "&");
        body.Append("client_secret=" + client_secret + "&");
        body.Append("username=" + username + "&");
        body.Append("password=" + password + security_token);

        using (var client = new HttpClient())
        {
            AuthURL = "https://login.salesforce.com/services/oauth2/token";
            var values = new Dictionary<string, string>();
            var content = new FormUrlEncodedContent(values);
            var response = client.PostAsync(AuthURL + body, content).Result;
            if (response.IsSuccessStatusCode)
            {
                var jsonString = await response.Content.ReadAsStringAsync();
                SFResponse dataObjects = JsonConvert.DeserializeObject<SFResponse>(jsonString);
                authHeaders = new AuthenticationHeaderValue(dataObjects.token_type, dataObjects.access_token);
                isConnectedToSF = true;
                return;
            }
            Console.WriteLine("{0} ({1})", (int)response.StatusCode, response.ReasonPhrase);
            isConnectedToSF = false;
        }
    }
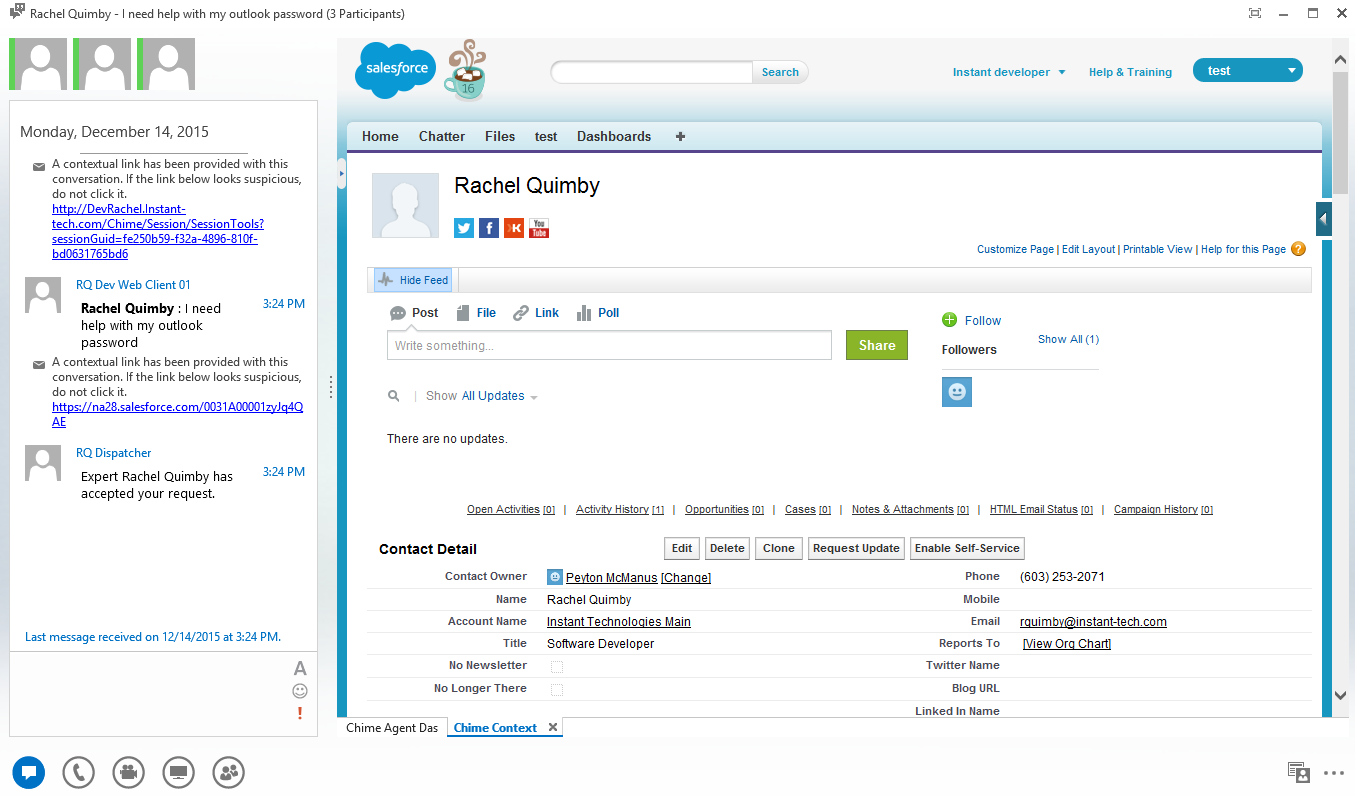
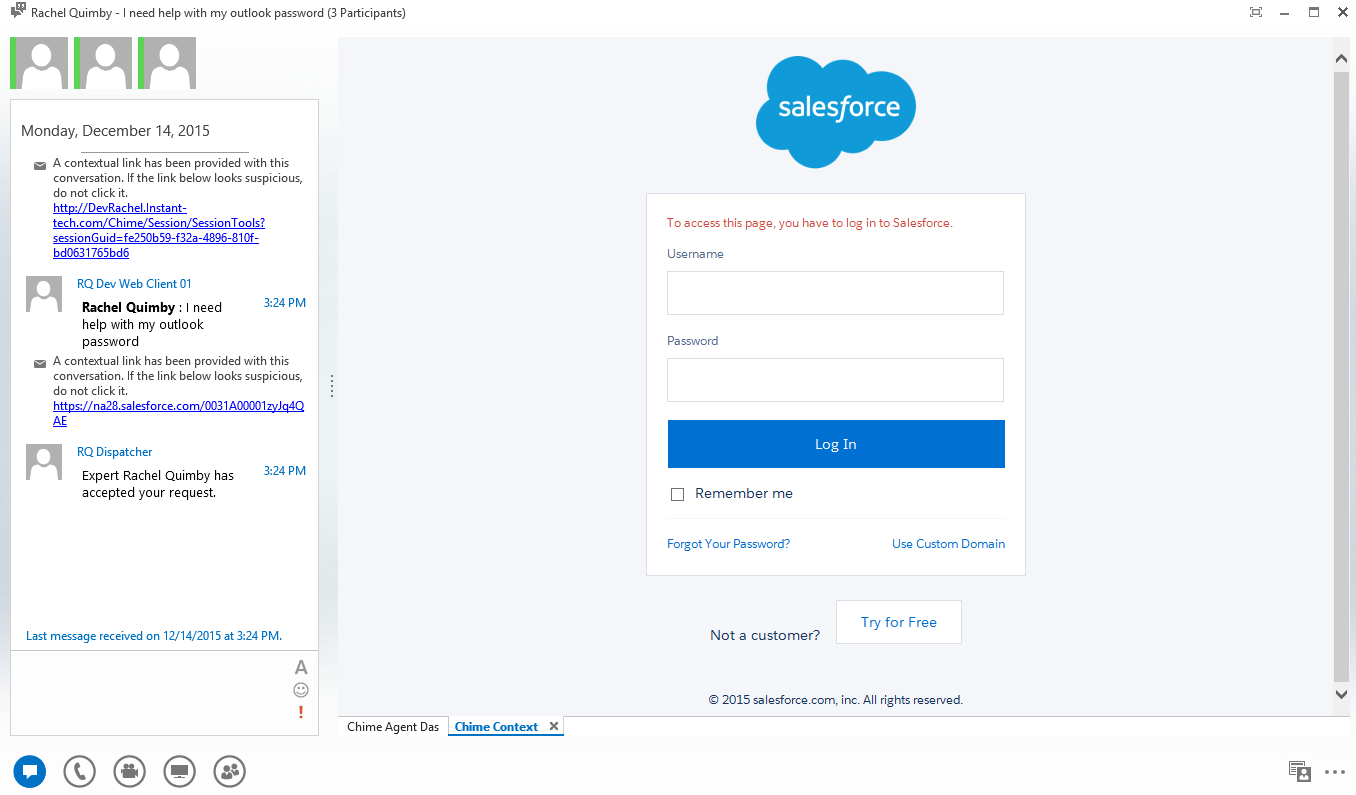
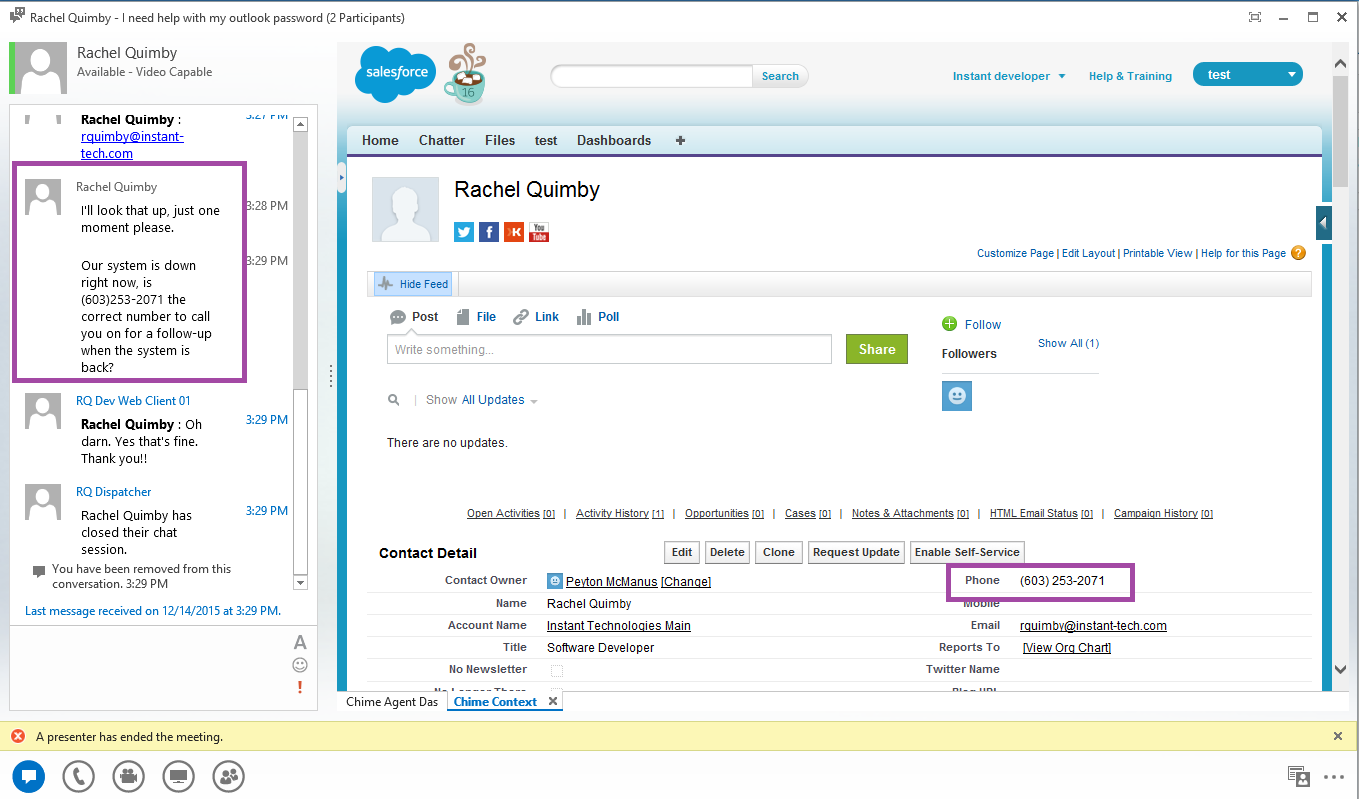
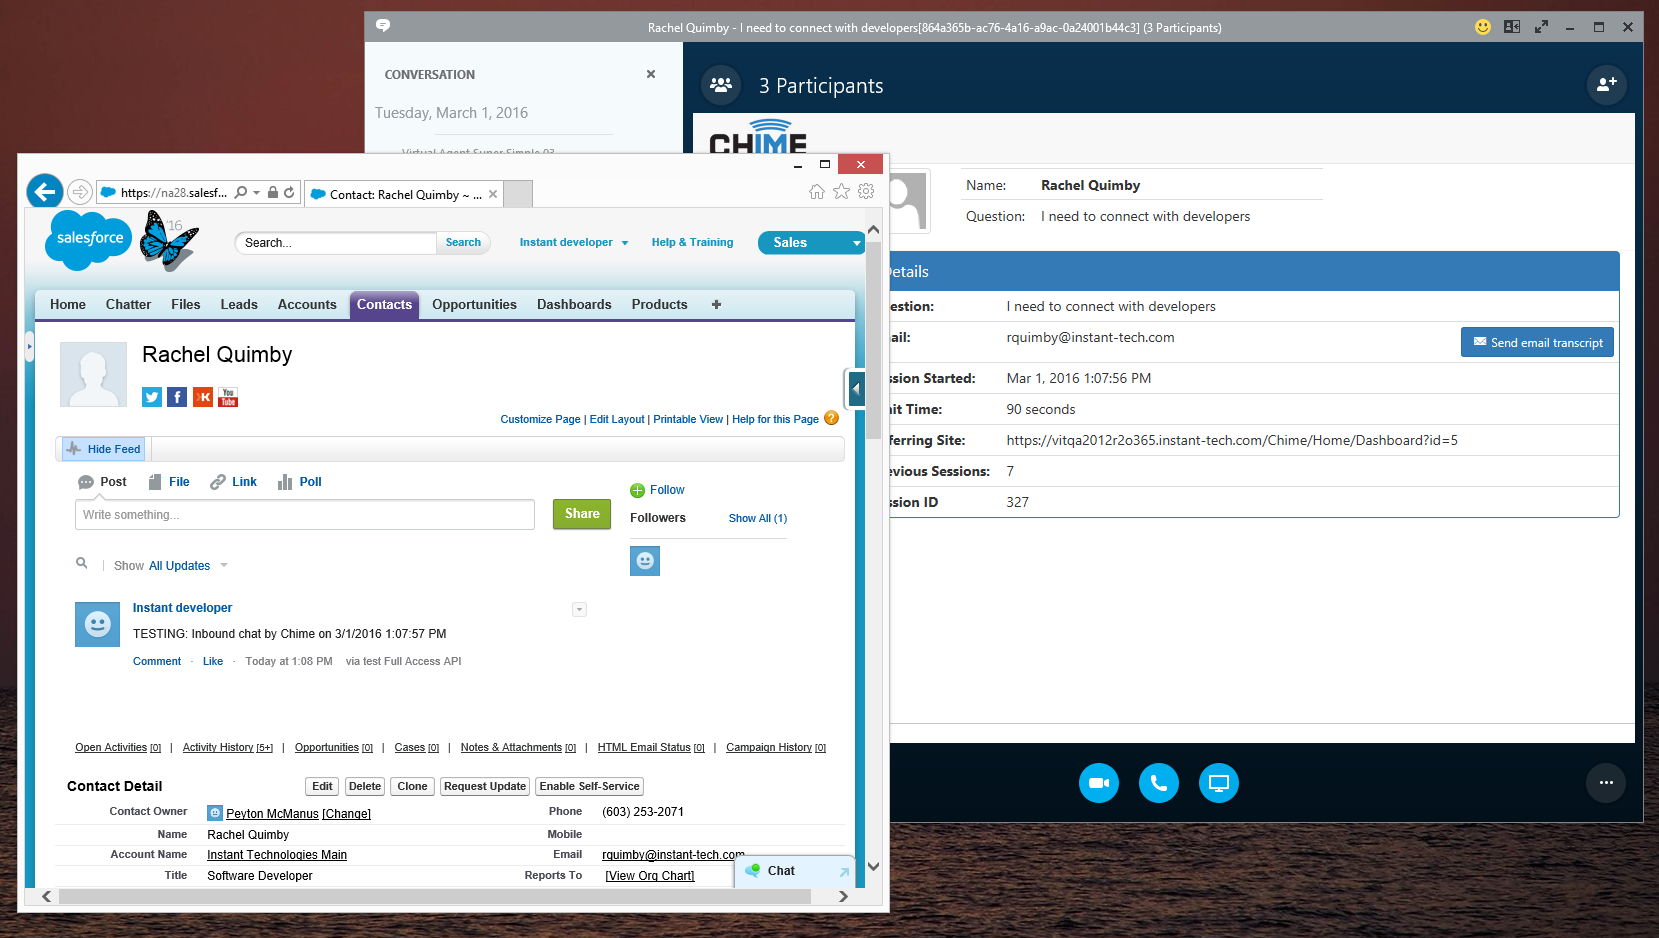
This example shows you how to query the Salesforce Contact table for records that match the provided e-mail address, and receive the Department and Title fields from those record. We’re using the authentication header created in the first example.
public class QueryResponse
{
    public List<Contact> records;
}
public class Contact
{
    public string Department = "";
    public string Title = "";
}
public static async void QuerySalesforce(string email)
    {
        using (var client = new HttpClient())
        {
            client.DefaultRequestHeaders.Authorization = authHeaders;
            var query = "SELECT Department , Title FROM Contact WHERE Email = \'" + email + "\'";
            var requestURL = instance_url + "/services/data/v20.0/query?q=" + query.Replace(" ", "+");
            var response = client.GetAsync(requestURL).Result;
            if (response.IsSuccessStatusCode)
            {
                var jsonString = await response.Content.ReadAsStringAsync();
                QueryResponse data = JsonConvert.DeserializeObject<QueryResponse>(jsonString);
                Contact seeker = data.records.FirstOrDefault();
                if (seeker != null)
                {
                    recordID = seeker.Id;
                }
            }
        }
    }
This example shows how you can update a record field in Salesforce, given that record’s ID. This sample will update the description field of a Contact record.
public static void UpdateSalesforce(string recordId, string description)
{
    using (var client = new HttpClient())
    {
        client.DefaultRequestHeaders.Authorization = authHeaders;
        var values = new Dictionary<string, string>();
        values.Add("Description", description);
        var stringPayload = JsonConvert.SerializeObject(values);
        var content = new StringContent(stringPayload, Encoding.UTF8, "application/json");
        var requestUrl = instance_url + "/services/data/v20.0/sobjects/Contact/" + recordId;
        var response = client.PatchAsync(requestUrl, content).Result;
        if (response.IsSuccessStatusCode)
        {
            Console.WriteLine("Success patching Contact object in salesforce");
            didUpdateSF = true;
        }
        else
        {
            Console.WriteLine(response.StatusCode + " " + response.ReasonPhrase);
        }
    }
}
This example will show you how, given a record ID, you can post a Chatter feed item directly to that Contact record’s page. The feed item will show up as being posted by the entity you have authenticated yourself as in Step 1.
public class FeedItem
{
    public Body body = new Body();
    public string feedElementType = "FeedItem";
    public string subjectId = Program.recordID;

    public FeedItem(string descr)
    {
        body.messageSegments.Add(new MessageSegment() { text = descr });
    }
    public class Body
    {
        public List<MessageSegment> messageSegments = new List<MessageSegment>();
    }
    public class MessageSegment
    {
        public string type = "Text";
        public string text;
    }
}

    public static void PostChatterFeed(string recordID, string description)
    {
        string chatterUrl = instance_url + "/services/data/v35.0/chatter/feed-elements?feedElementType=FeedItem&subjectId="+recordID+"&text=New+post";

        using (var client = new HttpClient())
        {
            client.DefaultRequestHeaders.Authorization = authHeaders;
            FeedItem values = new FeedItem(description);
            var stringPayload = JsonConvert.SerializeObject(values);
            var content = new StringContent(stringPayload, Encoding.UTF8, "application/json");
            var response = client.PostAsync(chatterUrl, content).Result;
            if (response.IsSuccessStatusCode)
            {
                Console.WriteLine("Success posting Chatter Feed object to salesforce");
                didUpdateSF = true;
            }
            else
            {
                Console.WriteLine(response.StatusCode + " " + response.ReasonPhrase);
            }
        }
    }
Have a question about Chime integration with Salesforce®? Ask one of our developers at InstantDev@instant-tech.com.
Note: The following steps can be downloaded here » MSDynamicsCRMIntegrationDoc.docx
The following examples use these references. These examples also use a reference to the Microsoft.Crm.Sdk, and System.Runtime.Serialization.
using System;
using System.Collections.Generic;
using System.IO;
using System.Linq;
using System.ServiceModel.Description;
using System.Text;
using System.Xml.Linq;
using Microsoft.Xrm.Sdk;
using Microsoft.Xrm.Sdk.Client;
using Microsoft.Xrm.Sdk.Query;
The following code shows you how to use your authentication credentials to create a reference to a service proxy object. Once this reference is made, you can make calls directly on the service proxy object to access tables and resources on your Dynamics server. The service proxy must be disposed after use.
var _serverProxy = new OrganizationServiceProxy(new Uri(service_url), null, new ClientCredentials() { UserName = { UserName = username, Password = password } }, null);
    public void ConnectToDynamics()
    {
        using (_serverProxy)
        {
            _serverProxy.Authenticate();
            isConnectedToDynamics = true;
            Console.WriteLine("authenticated with Dynamics");
        }
    }
This example shows you how to retrieve an EntityReference, this is an object that directly references an entity record in Dynamics, from the Contact table. We are going to try to find a Contact record with a given email address, and if we cannot find one, we’re going to create one. Contact records require a first and last name to be created in the system. Notice how we use the QueryByAttribute object to construct the query we will send to the server.
private EntityReference FindContactWithEmail(string email, string firstname, string lastname)
{
    //is there an existing contact with this email address?
    QueryByAttribute querybyexpression = new QueryByAttribute("contact");
    querybyexpression.Attributes.AddRange("emailaddress1");
    querybyexpression.Values.AddRange(email);
    EntityCollection retrieved = _serverProxy.RetrieveMultiple(querybyexpression);
    var contact = retrieved.Entities.FirstOrDefault();
    if (contact != null)
    {
        return contact.ToEntityReference();
    }

    //create new contact with this email address?
    Entity newContact = new Entity("contact");
    newContact.Attributes["firstname"] = firstname;
    newContact.Attributes["lastname"] = lastname;
    newContact.Attributes["emailaddress1"] = email;
    Guid newContactGuid = _serverProxy.Create(newContact);

    //fetch the entity of the newly created contact
    Entity foundnewContact = _serverProxy.Retrieve("contact", newContactGuid, new ColumnSet(true));
    if (foundnewContact != null)
    {
        return foundnewContact.ToEntityReference();
    }
    throw new Exception("unable to create new contact in Dynamics for " + firstname + " " + lastname + " " + email);
}
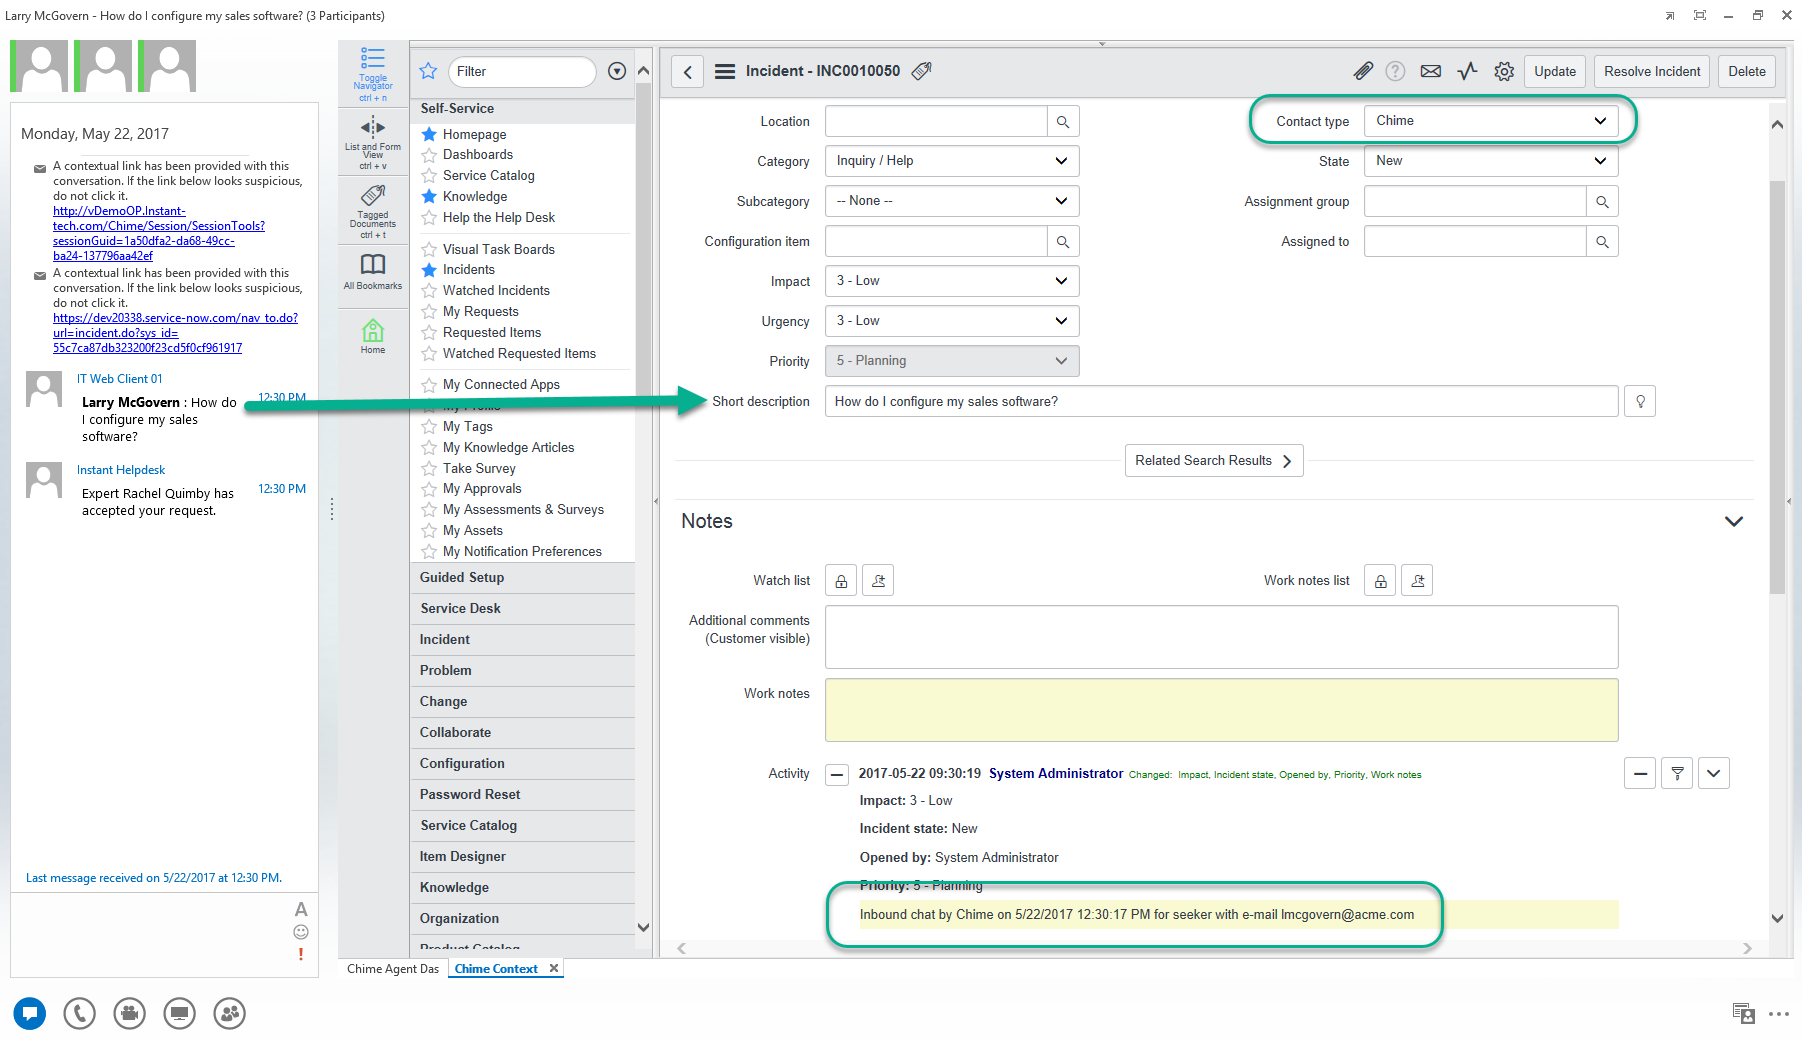
This example shows you how to create an incident record, or case, in Dynamics. First you create an Entity object and specify what type of Entity you are creating in the constructor, in this case it’s an incident Entity. We’re going to populate the title, description, and customerid fields of this new record before sending it to the server (notice how we use the FindContactWithEmail method from the previous example). We can construct a URL to this new record given the record GUID which is returned from the server on creation.
public void CreateCase(string firstname, string lastname, string email, string question)
{
    using (_serverProxy)
    {
        //create the new case/incident/ticket
        Entity entity = new Entity("incident");
        entity.Attributes["title"] = question;
        entity.Attributes["caseorigincode"] = new OptionSetValue() { Value = 100000004 }; //100,000,004
        entity.Attributes["description"] = "Inbounded chat by Chime on " + DateTime.Now;
        entity.Attributes["customerid"] = FindContactWithEmail(email, firstname, lastname);

        Guid newRecordGuid = _serverProxy.Create(entity);
        newRecordURL = instance_url + @"main.aspx?etn=incident&id=" + newRecordGuid + @"&pagetype=entityrecord";
    }
}
This example shows how you can update a record in Dynamics, given that record’s system GUID. This sample will add new text to any existing text of the description field of the case. When it retrieves the record it retrieves all columns. Note, the description field has a 2,000 character limit.
public void UpdateCase(string comment, Guid recordGuid)
{
    using (_serverProxy)
    {
        Entity entity = _serverProxy.Retrieve("incident", recordGuid, new ColumnSet(true));
        var olddescription = entity.Attributes["description"];
        var newdescription = olddescription + "\n" + comment;
        if (newdescription.Length < 2001)
        {
            entity.Attributes["description"] = newdescription;
            _serverProxy.Update(entity);
        }
    }
}
Have a question about Chime integration with Microsoft Dynamics® CRM? Ask one of our developers at InstantDev@instant-tech.com.
Note: The following steps can be downloaded here » ServiceNowIntegrationDoc.docx
The following examples use these references. These examples use Newtonsoft Json library to serialize the objects we send to the ServiceNow API in json.
using Newtonsoft.Json;
using System;
using System.Collections.Generic;
using System.IO;
using System.Linq;
using System.Net.Http;
using System.Net.Http.Headers;
using System.Text;
using System.Xml.Linq;
This code snippet shows you how to use your ServiceNow credentials to construct an authentication header for making basically authenticated HTTP requests to the ServiceNow REST API. The ServiceNow REST API supports basic authentication and OAuth. You can then use a dummy query to ServiceNow to verify that your authentication header is valid. The dummy query in this case asks for the first ten records from the Incident table, this is a default ServiceNow table.
authHeaders = new AuthenticationHeaderValue("Basic", Convert.ToBase64String(Encoding.UTF8.GetBytes(username + ":" + password)));
    public void ConnectToServiceNow()
    {
        using (var client = new HttpClient())
        {
            client.DefaultRequestHeaders.Authorization = authHeaders;

            string connectURL = instance_url + @"incident?sysparm_limit=10";
            var response = client.GetAsync(connectURL).Result;
            if (response.IsSuccessStatusCode)
            {
                isConnectedToServiceNow = true;
                Console.WriteLine("Success connecting");
            }
            else
            {
                isConnectedToServiceNow = false;
            }
        }
    }
This example shows you how to create an incident record (ticket) in ServiceNow via their REST API, populate some fields, and then construct a URL to the newly created ticket. We use the Newtonsoft Json library to serialize a local Incident object for making the Post request. For Post requests, ServiceNow requires the accept header and the content-type header to be “application/json”.
public class Incident
{
    public string short_description;
    public string work_notes;
}
    public void CreateTicket(string email, string question)
    {
        string createIncidentURL = instance_url + @"incident";
        Incident newIncident = new Incident() { short_description = question, work_notes = "Incident reported by " + email};
        var jsonString = JsonConvert.SerializeObject(newIncident);
        using (var client = new HttpClient())
        {
            client.DefaultRequestHeaders.Authorization = authHeaders;
            client.DefaultRequestHeaders.Add("Accept", "application/json");
            HttpRequestMessage request = new HttpRequestMessage(HttpMethod.Post, createIncidentURL);
            request.Content = new StringContent(jsonString, Encoding.UTF8, "application/json");
            var response = client.SendAsync(request).Result;
            if (response.IsSuccessStatusCode)
            {
                var newIncidentURL = response.Headers.Location.OriginalString;
            }
        }
    }
This example shows how you can update a record in ServiceNow, given that record’s sys_id. This sample will update the comment field of an Incident record, given that record’s sys_id.
public class UpdateIncident
{
    public string comments;
}

    public void UpdateTicket(string comment, string sys_id)
    {
        UpdateIncident updateIncident = new UpdateIncident(){ comments = comment};
        var jsonString = JsonConvert.SerializeObject(updateIncident);
        string updateIncidentURL = instance_url + @"incident/" + sys_id + "?sysparm_exclude_ref_link=true";
        using (var client = new HttpClient())
        {
            client.DefaultRequestHeaders.Authorization = authHeaders;
            client.DefaultRequestHeaders.Add("Accept", "application/json");
            HttpRequestMessage request = new HttpRequestMessage(HttpMethod.Put, updateIncidentURL);
            request.Content = new StringContent(jsonString, Encoding.UTF8, "application/json");
            var response = client.SendAsync(request).Result;
            if (response.IsSuccessStatusCode)
            {
                Console.WriteLine("Success updating ticket");
            }
            else
            {
                Console.WriteLine("Unsuccessfully updated ticket");
            }
        }
    }
Have a question about Chime integration with ServiceNow®? Ask one of our developers at InstantDev@instant-tech.com.
Note: The following steps can be downloaded here » AlchemyIntegrationDoc.docx
The following examples use these references. These examples also use a reference to the Alchemy sdk.dll.
using System;
using System.Collections.Generic;
using System.IO;
using System.Linq;
using System.Text;
using System.Xml.Linq;
using System.Xml.Serialization;
The following code shows you how to authenticate with the Alchemy AI service. The only credential this requires is your Alchemy API key which can be requested from http://www.alchemyapi.com/api/register.html.
AlchemyAPI alchemyAPI = new AlchemyAPI.AlchemyAPI();
    public void ConnectToAlchemy()
    {
        try
        {
            alchemyAPI.SetAPIKey(apiKey);
            isConnectedToAlchemy = true;
        }
        catch (Exception ex)
        {
            Console.WriteLine(ex.ToString());
        }
    }
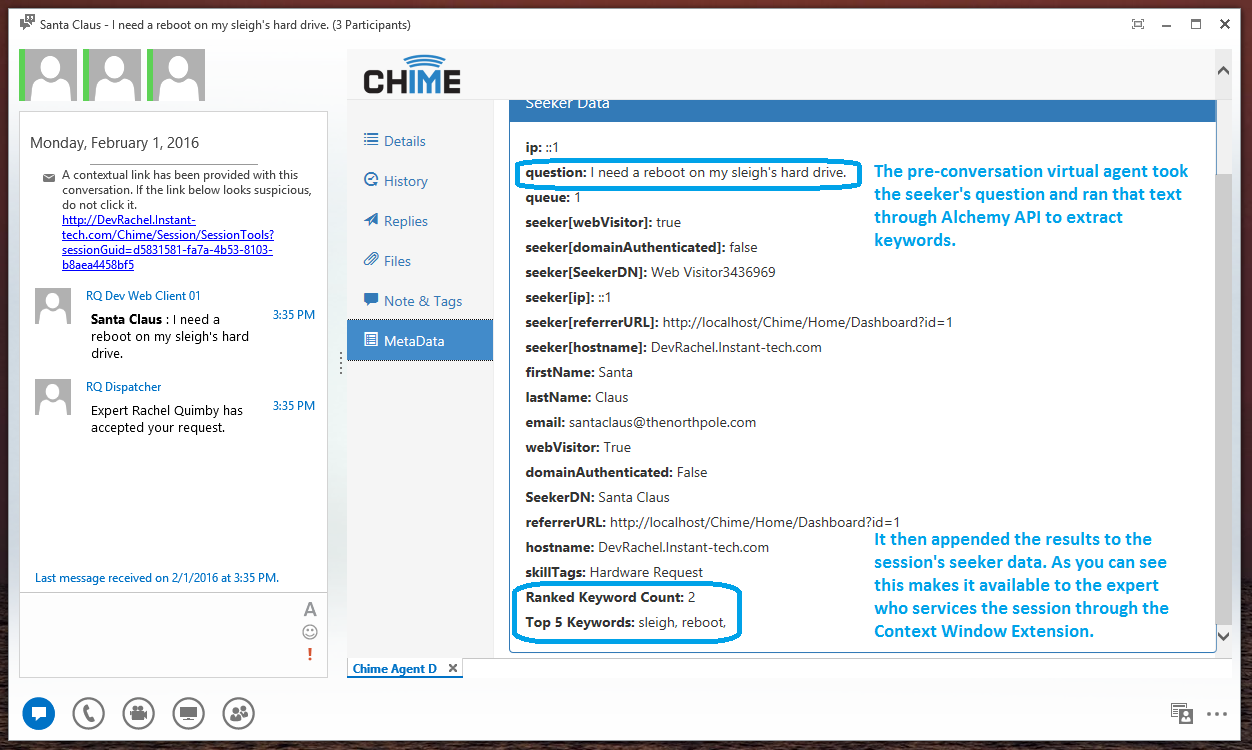
One of the things Alchemy API is very good at is analyzing a body of text. This first example will show you how to leverage this capability to extract topic keywords from some text, ranked by their relevance as perceived by the Alchemy service. Note, Alchemy responses are in XML format. For brevity, the RankedKeywords class that is used to bind to the deserialized response is not included, but you can construct your own class from the resources provided by Alchemy on this page (scroll to the bottom Response Format (XML) section) http://www.alchemyapi.com/api/keyword/textc.html. I’ve also excluded the TopFiveKeywords method, this simply string-ifies the text field of the first five keywords.
public RankedKeywords.Response GetRankedKeywords(String text)
    {
        RankedKeywords.Response status = new RankedKeywords.Response();

        try
        {
            if (alchemyAPI != null)
            {
                RankedKeywords.results response = new RankedKeywords.results();
                XmlSerializer serializer = new XmlSerializer(response.GetType());
                var xml = alchemyAPI.TextGetRankedKeywords(text);
                Console.WriteLine(xml);
                object deserialized = serializer.Deserialize(ToStream(alchemyAPI.TextGetRankedKeywords(conversationText)));
                response = (RankedKeywords.results)deserialized;
                status.Result = response;
                status.Status = "SUCCESS";
                Console.WriteLine("Ranked Keyword Count: " + status.Result.keywords.Count());
                Console.WriteLine("Top 5 Keywords: " + TopFiveKeyWords(status.Result.keywords));
            }
        }
        catch (Exception ex)
        {
            status.Result = null;
            status.Status = "ERROR: " + ex.ToString();
            Console.WriteLine(ex.ToString());
        }
        return status;
    }
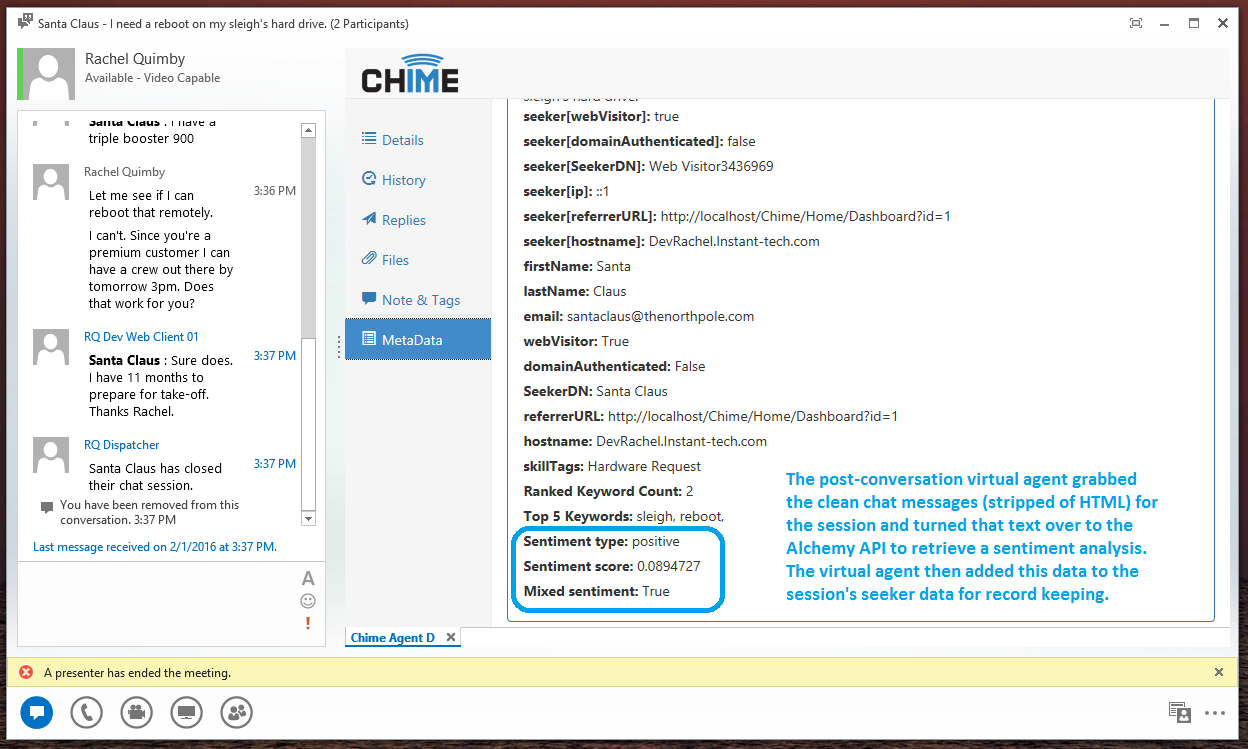
This second example will show you how to use Alchemy API to retrieve a sentiment analysis of a body of text. Alchemy uses the following data points to report sentiment analysis:
Once again, for brevity we have excluded the class source code that binds to the Alchemy XML response. This documentation shows you how the response will be formed http://www.alchemyapi.com/api/sentiment/textc.html.
public SentimentAnalysis.Response GetSentiment(string conversationText)
{
    SentimentAnalysis.Response status = new SentimentAnalysis.Response();
    try
    {
        if (alchemyAPI != null)
        {
            SentimentAnalysis.results response = new SentimentAnalysis.results();
            XmlSerializer serializer = new XmlSerializer(response.GetType());
            object deserialized = serializer.Deserialize(ToStream(alchemyAPI.TextGetTextSentiment(conversationText)));
            response = (SentimentAnalysis.results)deserialized;
            status.Result = response;
            status.Status = "SUCCESS";

            if (status.Result != null && status.Result.docSentiment != null)
            {
                if (status.Result.docSentiment.type != null)
                {
                    Console.WriteLine("Sentiment type: " + status.Result.docSentiment.type);
                }
                Console.WriteLine("Sentiment score: " + status.Result.docSentiment.score);
                var mixed = status.Result.docSentiment.mixed;
                Console.WriteLine("Mixed sentiment: " + (mixed == 1 ? "True" : "False"));
            }
        }
    }
    catch (Exception ex)
    {
        Console.WriteLine(ex.ToString());
    }
    return status;
}
Have a question about Chime integration with Alchemy®? Ask one of our developers at InstantDev@instant-tech.com.


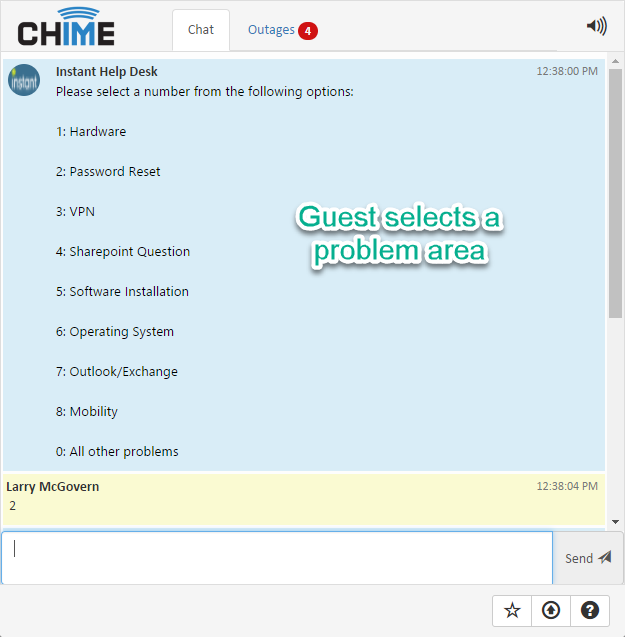
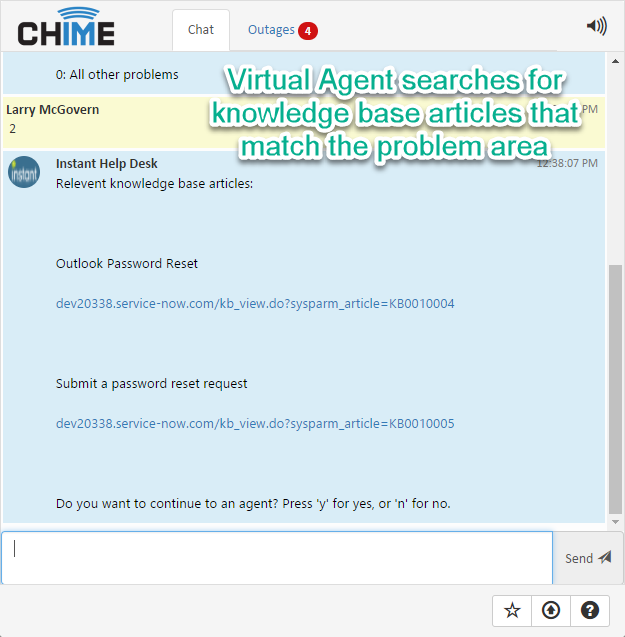
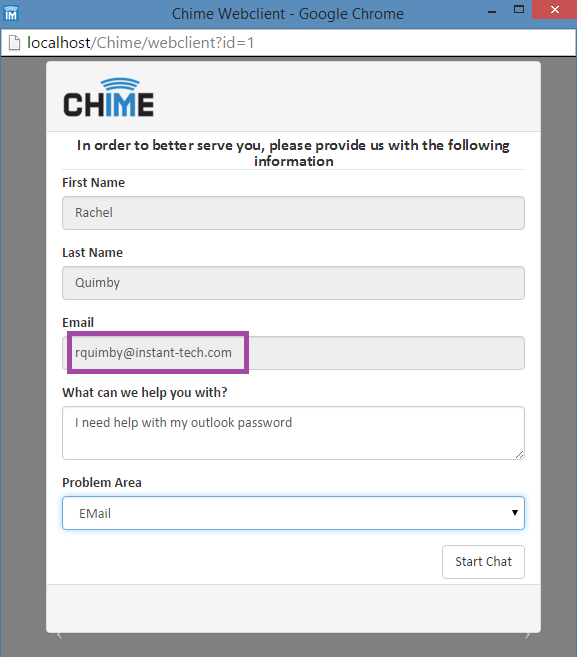
 Virtual Agent Presentation (11)
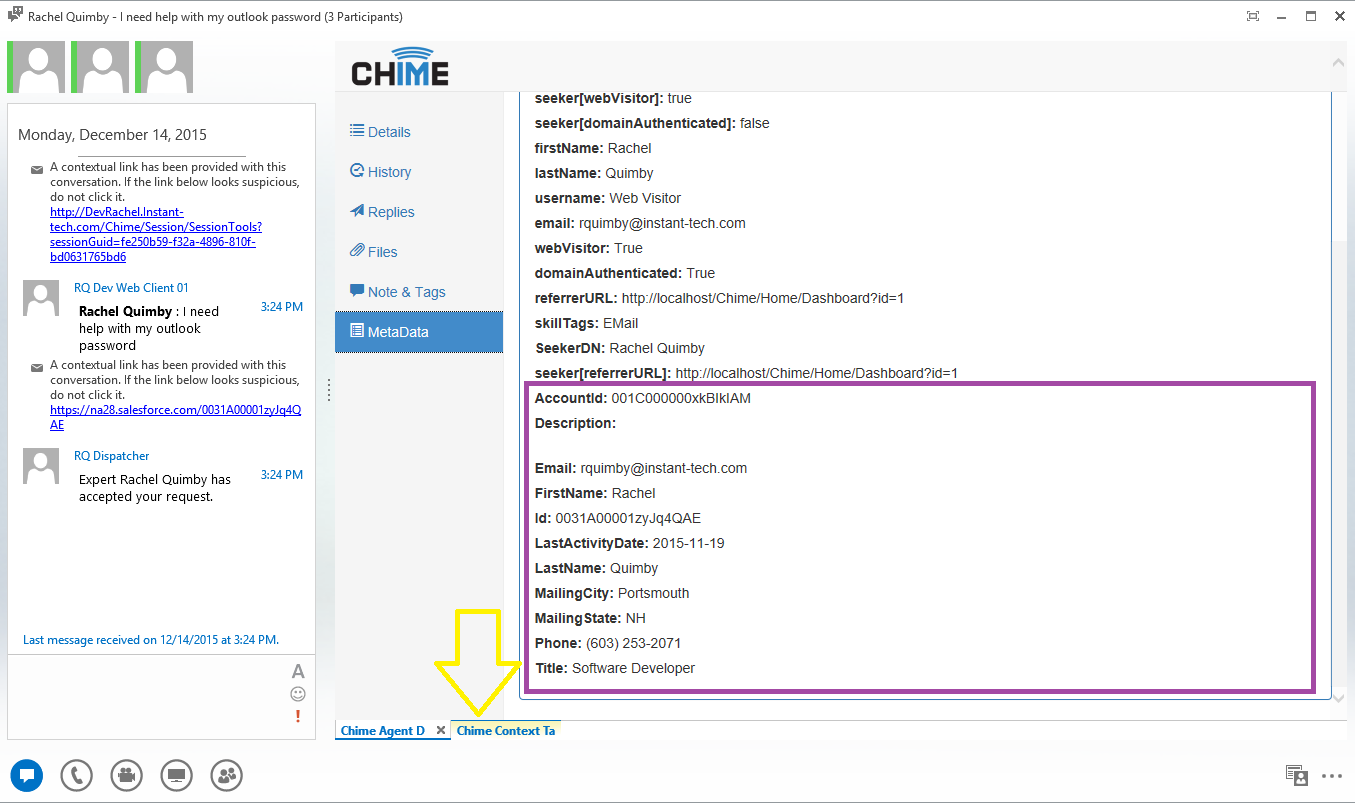
 Grabbing Salesforce® Contact (5)
 SMTP Integration (3)
 Salesforce® Integration (7)
 MS Dynamics® Integration (6)
 ServiceNow® Integration (8)
 Alchemy® Integration (3)